Good Morning Friends and Happy Sunday to you! Ready to be inspired?? Sit back, grab something to drink, and enjoy because I've the amazing honor of being the first guest designer for the Inspiration Elevator challenge group and I can't wait to share what I've come up with - it was no easy feat I tell ya'!

So what is Inspiration Elevator?? Simple - its a group of fantabulous crafty ladies looking to take their own style to the next level by issuing monthly challenges that cause one to be taken out of their comfort zone (this month almost did me in!!! LOL - but seriously it did!). The group began their journey in May with a challenge based around showcasing what their styles were, products/techniques they liked to use, etc. Last month they looked at how to focus on the true reason for scrapping (gasp! there is a reason beyond all the fabulous papers, tapes, inks, and pastes one can use?? teehee) and focused in on the story behind the photos - to choose photos not because a cutie kid is giving the camera a cheesy smile but because they evoked some type of emotion/story. This is month three and Audrey Yeager issued the challenge - here's what she had to say:
" I take a lot of photos. Right now, I have been using 2 or 3 smaller photos on my layouts. But
truth is, I have a lot of events where I would like to include a lot of
photos on a larger spread so that you can see the details in the photos
to. So I print out the photos with the intention of putting them on a 2-page spread...
I just can’t get it. I feel like I have a certain style, yet when I sit down to create a 2 pager, it feels nothing like “me”.
SOOOO, your next challenge is to create a double page layout. And I don’t mean just any double page. I
want you to really think about your style and your design practices for
single pagers (the first assignment helped us define our style, so
think about those elements). Then take those ideas and try to apply them to a double pager.
Here are some ideas:
*Start by thinking of your canvas as a 12x24” size. Before you even print photos or pick papers, try to envision (or sketch out) a design that feels like “you”.
*Once you have a basic design, think about the techniques that you love and where/how you will incorporate them on your page.
*Choose products that you would use for a single page layout. If you use white cardstock as a base a lot of times, then use it on your double page. If you mostly use patterned paper, then use that. And
if you don’t have 2 of the same sheets of patterned paper for your
background, I REALLY challenge you to use 2 different 12x12 sheets for
the base of your spread! (Kim
Watson does a superb job of using 2 different sheets for her
backgrounds…if you have CK magazine, look at some of her pages.) http://kj-starre.blogspot.com/
*Another way to approach this, (which I personally
want to experiment with more), is to create 2 single pagers, but use
the same papers in the same ratios. The papers and the photos will help tie your design together.
You might do this challenge and not be happy with your first result, so I challenge you to KEEP TRYING! Do a 2nd , double page layout and try to learn from your “mistakes” on the first one.
Also, if you typically DO create 2 pagers, then apply the same ideas to a single page spread instead.
As we create this month, if you have thoughts
about your process or are struggling, OR you are loving what you are
creating, share some of your ideas with us!!!
I can’t wait to see what you create!"
Okay so really??! REALLY!!!???! A two pager - ack! I haven't done one of those since like - hardly ever!! I never really did two pagers, just not my thing. But alas I already said yes to the design gig, LOL, so nuttin' to it but to do it, right?
 |
| I worked my base on watercolor paper - this helps everything hold up a tad better, though I'm thinking with the way I'm using ink spray these days I need to get a heavier weight. I spread some Liquitex molding paste through Crafter's Workshop stencil - allowed it to dry and then sprayed over with Dylusions ink sprays - have I told you lately how much I love them??! True story - I only used three colors to create this splendid rainbow effect!! |
My first thought after reading Audrey's challenges and tips to get started was to do my project straight up on canvas. I could've sworn I had an 11x17 one and guess what?? I didn't - sigh - moved forward with my same idea on paper instead.
 |
| At this point I was pretty psyched about using this grid format and filling in the center with the title adding a few embellishments and calling it a done one - challenge met - the problem?? It didn't feel like that would be my kind of page - moving on - again. |
With tons of my iPhone photos printed, I started playing around with placement and how to work in more than just three or four - which is already a lot for me. I also really wanted to 'catch up' in a way with the other challenges through this one by creating a page that reflected my style right now and by using photos that were more than just smiling kids - combine all that with creating two pages worth and I was seriously perplexed on how to work it out.
I set about looking at my some of my recent one pagers and decided I needed to incorporate the following:
some type of scene
lots more paint, ink, texture, and layers
a few less photos but more than 4
This:
 |
| I decided I needed to create my own sunburst stencil. I've made similar ones for cards but hadn't ventured larger - now seemed like a good time - can I just say I'll be using this over and over for reals! Love how it turned out - so stinking easy too - I only regret not making on some blank make-your-own stencil sheets I had. |
plus this:
 |
| I used a piece of ScrapFX chicken wire chipboard as a stamp using gesso - scribbled some NeoColors II over it - used a waterbrush to thin out. |
plus this and a few extras:
 |
| These clouds were created using one of the new ScrapFX stencils - gesso was pounced through the stencil - allowed time to dry - sprayed over with Dylusions - patted dry over the gesso area to take up some of the color - outlined - and cut out. |
equaled this:
 |
| Now the fun begins! Playing with different elements - building up layers - stamping - oh my! |
Once I hit my comfort zone and decided this was going to be a ginormous page I had a much better time with things. On the rare occasion when I've done two pagers in the past I worked on the pages as a whole and would cut them apart - with what I had wanted to do on an actual canvas being converted to paper this wouldn't work so I rolled with it - is that cheating?? Sure hope not - really don't wanna hack this baby up in two - wanna see why?

I'm giddy about this spread not only because I fit 9 photos of our life right now on it but because they are all interchangeable!!! Yes I said interchangeable!!!! With the exception of two photos I wanted to be stuck forever the rest can be changed out to reflect our current Life Snapshots with ease!
 |
| Lots of Gauche Alchemy punchinella and washi tape used here along with some sequin trim and ScrapFX chippies - my fav are the Polaroid pieces!! |
Each spot containing a photo is placed in a clear pouch. The pouch is sealed on three sides with one open for inserting you photo. The back is already sticky and ready to placed on the page. Talk about the perfect stash item for this project, huh?
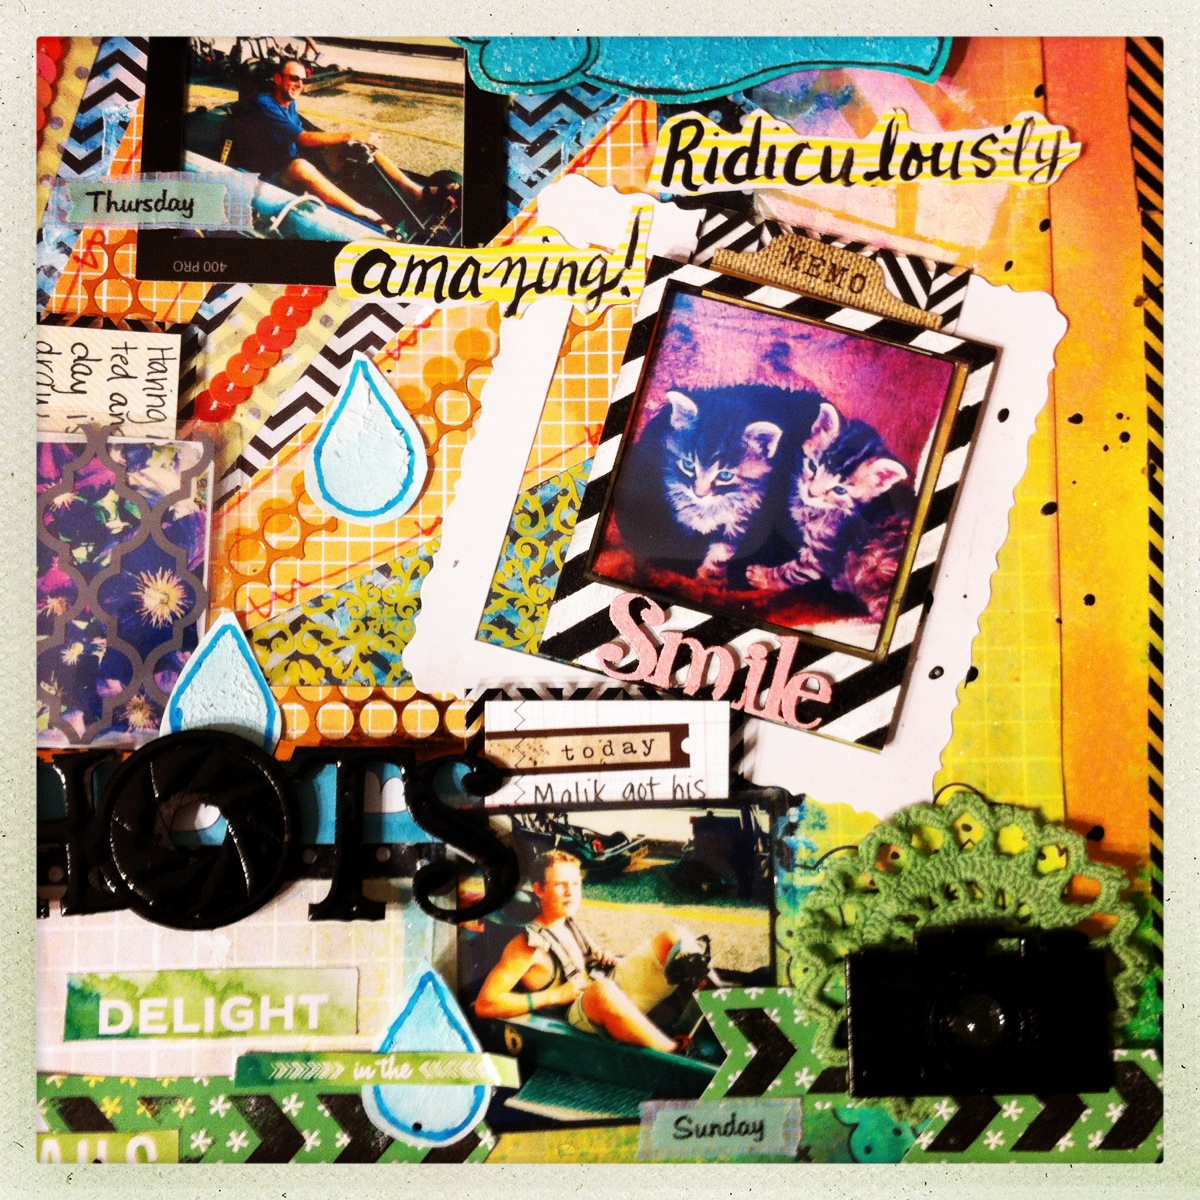 |
| The phrase I painted on the yellow patterned paper was found on Pinterest - one of my goals is to get some of the sayings I've pinned off the boards and onto projects or into a journal. I used UTEE on the camera and word Snapshots - hard to tell in these photos but this technique gave them both shiny camera finishes. |
 |
| Here you can see how I cut up some pieces of Hambly transparency to go over the picture. I did this in a couple other spots as well. Kind of fun to have to pull out the photo to see it fully. This also shows my favorite cloud from teh ScrapFX cloud and raindrops stencil. |
 |
| Title work - again a tad fuzzy - sorry about that. Another fuzzy thing to peep out here is the journaling card mounted on some Hambly. Thanks to my sweetie friend Michelle I had some Elle's Studio tags to create with - I was thinking this will make using these photos a breeze down the road and I do have plans for when I swap them out. |
So what did I learn from this tremendous challenge?
1. I'm not a two page scrapper and will look for any way to get out of having to actually cut down a large page to two
2. I like the idea of creating blanket pages where I can use up some more of these pouches and swap photos out.
3. I need some 11x17 canvases in the house, LOL
4. Its okay to veer off from original plans and run with the creative energy, take breaks when needed, and have fun.
I can't wait to see what all the other gals created and I'd love for you to check them out as well.
Are you up for this challenge?? If you so dare I'm going to try and get a Mr. Linky here for you to use so I can come visit when you've completed a two pager! I'd love to have more double page inspiration from you all!
Have super days and thanks for stopping by!!
Wow - seriously amazing! Everything is so bright and fun and I love how the photos are interchangeable so your design can always reflect the here and now! Thanks so much for being our guest designer this month :)
ReplyDeleteJoanne xo
Girl, you ROCKED it! Love it!
ReplyDeleteScarlett, I am so very very thrilled with your design!, I adore bright colors and artistic touches. Thank you do much for being our guest this month. We are so lucky to have you!!! Stunning!,,,
ReplyDeleteI am speechless..omgawd..this is amazing! Please make me one of those cool sunburst stencils! LOL! Again..amazing layout!
ReplyDeleteAll I can say is WOW, I don't even have the words. This layout is incredible, there is so much to look at, it really draws you in! Thanks for playing with us this month at IE!
ReplyDeleteOh. Em .Geeee...It's almost like you were speaking another language..I haven't even heard of most of the products you used on this beautiful artpiece...I'm SO SO impressed!!!!GORG girl...just GORG!!!
ReplyDeleteWOWOWOWOWOW - that is so awesome! I love everything about this!
ReplyDeleteScarlett, my friend, I am SO glad you agreed to do a gdt gig with our group. I knew you would do your Scarlett thing and totally make this challenge your very own. Your beautiful artsy bright technique laden page is wonderful and I'm glad it's going to be so practical for you too, with swapping out photos! Whenever you have a month that is not too heavy for work, you just let me know and you are welcome to join us for another challenge. Smooches!
ReplyDelete- Ann Jobes
www.lovestnpaper.com
Wow! Such amazing techniques - I want to come and play with you at your house one day! :) Thanks for joining us this month - I love your style!
ReplyDeleteLove this!!! What an amazing masterpiece!! Thank you so much for sharing it with us at Paper Issues. We featured you today: http://paperissues.blogspot.com/2012/08/life-snapshots.html
ReplyDeleteThis is gorgeous! I wish I had as much patience to create something this beautiful!
ReplyDeletewow! absolutely stunning!!
ReplyDelete