Wednesday, November 27, 2013

Give Thanks Canvas

I'm ever thankful for the many blessings in life and with Thanksgiving soon upon us here in America I thought it would be fitting to share how thankful I am for each and every one of you, my creative friends, that come here and visit.  

For you I.....

for all the encouraging words, sweet notes, laughs, and hugs sent through cyberspace.  For cards, packages, tags, and happy mail sent.  For friendships built and prayers uplifted, I give thanks to you.  These are things I cherish and could have never expected when I dived on in to the online world of scrapbooking/blogging some years ago.  It never ceases to amaze the kind hearts of papercrafters near and far.  

As you head in to Thanksgiving I wish you a blessed day with your family, and the same even if you won't be celebrating this feast.  May you be reminded what a treasure you truly are.


May you have time to just be still and thankful for all the wonderful blessings you have right here, right now.
Take good care and Happy Thanksgiving!
ScrapFX Product Used:


Thursday, November 21, 2013

Tutorial for Thursday - Project Life Insert Card

One of my favorite things about Project Life is how you can truly customize it.  I've been getting more and more in to this aspect as I've plugged along and ScrapFX has really helped my journey with all the fabulous mini chippies they've come out with, their fun stencils and stamps, and the best part - the offering of super durable project life size cards that hold up to mediums fantabulously!!


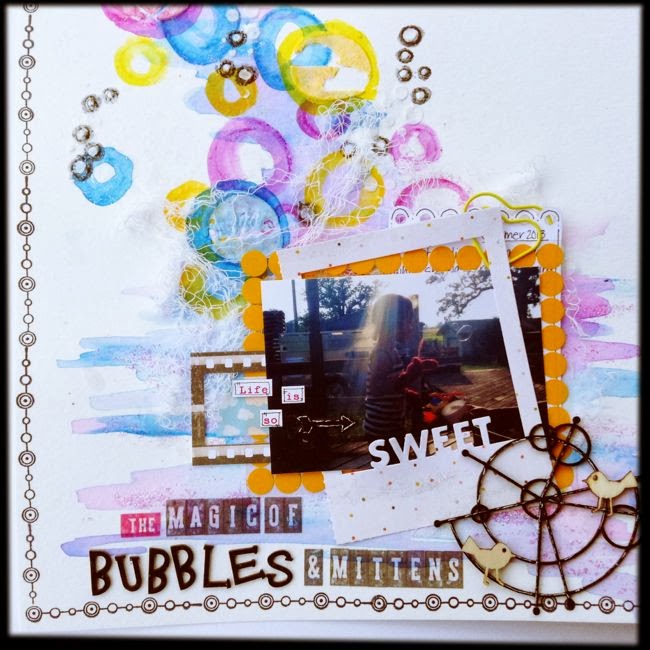
This is the insert I'll be showing you how to create today.  I was prompted to create this after seeing the wonderful shots of my son from his senior photo session.  We have so many great photos I know I'll be adding some to my album and I want to be prepared with some inserts for when I do!  Of course this can really be suited for so many things though, don't you think?  Lets get started.
 
 
Step One: Begin by covering the Kraft Card, large (2013335 KL) with gesso.  Once that is dry completely, color the card with mists.  I used two colors and added some water to allow for the colors to run and blend a bit.  Note: If you are going to use water to blend colors make sure they will not turn in to a muddy mess.  For this background I wasn’t overly concerned with darker colors occurring as I wanted a grungy look, but for other projects I’d take a bit more caution. 
 
Set this aside to dry or you can use your heat gun. Note: If you use your heat gun, some warping of the card will occur.  It can be straightened out but less will happen if you let it air dry.
 
 
Step Two: Take a background stamp and randomly apply it to the dried background.  Use your judgement on what looks good and try to create some balance to this.  You don’t want to over do it though, leave some space open.
 
 
Step Three: Use some gesso and water on your fingertip to lighten up the area you are going to get ready to stamp on.  Do this by gently smudging the gesso around.  It will pick up the colors of mist and create the smoky effect you see underneath the stamped area in the above image.

Ink up the Cogs Stamp (2013284) with VersaMark ink and stamp in across the corner of the card.  Pour gold embossing powder over it.  Heat set.  Note: Don’t be bothered if some embossing powder gets on other areas of the card.  This will only add to the texture and grungy overall look.
 
 
Step Four: Apply Rub n’ Buff over the stamped area to tone down the brightness of the embossing and give it a more aged, grungy look.  If you don’t have Rub n’ Buff you could use inks.  Apply this randomly on a few other sections of the card also.
 
 
Step Five:  Color cheesecloth (you can use gauze) with some mist and apply to card.  Alter up a Vintage Plane (2013288) by outlining it with pen and adding some Distress Stickles to it.  Adhere over top of cheesecloth with twine underneath.  Draw a line of glue in pattern you desire twine to be in.  Adhere twine to glue line. Add text and outline with a pen.

This card would look great as is in a journal, as the cover of a mini, or just by itself as a tag of sorts don’t you think?

Here are a couple pages from my album where I've created custom inserts or portions of pockets to make my PL album more my own.  Like I've said in the past I love what I see in kits but I don't really have the budget to get in to them.  I have bought some actual journal inserts and what not, but I find myself reaching for them more for my cards and LOs than for my PL album.  


 Here you can see one of the inserts actually looks somewhat similar to the one created above.  Its so simple to use quick techniques and make something that looks unique, not to mention it matched my photo. ;)


Here the long portion of the insert was created by me.  I used stencils, paste, misting, NeoColors, and then added embellishments and a stamped sentiment over the top.  The photos were spruced up with phone apps and then printed out - such fun this adds I think.  

Stay tuned to the ScrapFX toward the end of the month where I'll be sharing my PL type take on a December album and how I'm gearing up!!  I will make it this year since I'm actually planning - ha! I'm also looking forward to the New Year and starting a 2014 book - what about you??  Any plans to join in this year?


Tuesday, November 19, 2013

A Work in Progress Canvas & a New ScrapFX Challenge for You!

Its been a lot of fun (and work ;) ) creating things I hope people will find delight in looking at and perhaps purchasing for market.  The super thing is I can do this while knocking out some assignments at the same time - bonus!!


This month we have another Mood Board Challenge going at ScrapFX for fans to join in on.  There isn't a need to have ScrapFX product to participate - super cool if you do though!!  The Designers all partake in the challenge as well and post their take on the board as well as the twist given by the board creator - gotta have a twist to make it more interesting, right?  This month's twist is to use stencils, easy peasy except there are so many splendid ScrapFX stencils its hard to narrow down which to choose. 


For my take I was inspired by the rainbow colors, of course, I mean how could I not be??!!  This blog oozes color - ha!  Then I was also inspired by the eye on the board and that spun in to the creation of the girlie on this canvas - from there I let my imagination go wild giving her a little scene.   Since I don't live near the ocean, like the board image shows I went with the country life instead. :D

* I will share this piece isn't fully finished.  Its about 95% done and there are still some finishing details I want to fuss around with to complete it.  Not wanting to force and be unhappy with the finished result I left it as it was for now and will have it complete by the end of the month when I post my personal reveal.


I created my girlie's afro by using the ScrapFX Cogs Stamp with some colored heavy gesso and stamping it onto the canvas.  I then went back in with watercolor once this was completely dry to fill in the rest of the color.  In the background I used the Random Dots stencil to give the sky some texture and I went around the girl's head with some glitter glue to help it stand out against it.  I wish this showed up better....arrrgghh!!


Here you can see the Crosswords Stencil in action.  This was the first time I'd used it and I really am diggin' the effect it gave and the ease of use - I thought perhaps I'd have a struggle controlling where I put the paste, but nope.  Maybe my circle obsession will be shared with squares now - teehee!!  I adore those little chippie apples and kind of wish they were sold on their own....hmmm... maybe I shall suggest that. Some stamping and lots of paint layers make up the grassy areas along with some pen work.  

And that is where I've left off.  Still not exactly sure what details I'm going to add but have been playing with a few things here and there.  Any suggestions of what you think miht just absolutely make this?  I'm thinking I may want to add text or a quote or a ScrapFX wordlet - just can't decide what will fit yet.  The grassy areas need to be broken up more......sky too..... so holla' if you have ideas I'd love to hear them.  :)  I'd also love to see you playing along with the challenge!!!  This is the last one we'll be having for a couple months as we head in to the Christmas and holiday season so get in while you can for your chance to win some great goodies!!!

Until next time, take good care and thanks so much for stopping by!

Sunday, November 10, 2013

The Magic of Bubbles - Skissedilla #229

Hello There!  It has been a flurry of activity around my house as I prepared, set up, and participated in the first of a few markets for the season yesterday.  It was a blast as I had my baby girl with me helping and I'll be sure to share photos soon.  

In the meantime there is a new sketch out at Skissedilla for you to play along with during the month of November:


The lovely Brit created this one and you have oodles of time to join on in with the new adjustments to our posting - one sketch per month now instead of weekly sketches.

My page started off looking like this:


I had a vision of where I was going to go with my page and began playing with some watercolors along with my NeoColors.  I'm really smitten with circles these days in my projects.  I've always had a thing for them when I doodled and that dates back to when I was a youngster in school - zentangles of circles could be found all over my notes. ;)


I continued to layer up the circles using a variety of stencils to help out this time.  I used a few bits from the Studio Calico Sundrifter Mask and then of course I had to use my all time favorite stencil now - Random Dots from ScrapFX.  Each of these were used with some modeling paste and once dried they were highlighted with different mediums - the Sundrifter circles with more NeoColors to blend in and certain Random Dots with a Stabilo pencil.


With some very simple layers, ScrapFX chipboard, a couple wood veneers, letter stickers, and some stamping my final page came together quite quickly.  I really wanted to create a string of bubbles that seemingly continued on from the ones my niece was blowing in the picture.  Since the picture is more of a silhouette I didn't want too much going on around it - the background was busy enough - and so simple layering with the cheesecloth under seemed to work best. 


As you can tell I continued the circle theme throughout the entire page by using a Hambly transparency with circles, a graphic chippie from ScrapFX with circular elements, and of course the stamping is all about the circles.  I worried it might be overkill but in the end I liked the flow it created.  The chippie here was altered up with some black paint, decked out with a little touch of sparkle, and then highlighted with just hints of white gel pen. The words and letters are from Cosmo Cricket, Amy Tangerine, and ScrapFX.  I love, love the new vellum letters/words from Amy Tangerine - wish I would have picked up two packs of each!!

So there you have it the Magic of Bubbles and Mittens because yes my niece is in fact wearing mittens while she is blowing bubbles in the middle of some of the hottest days we had this past summer - that is just how she rolls - ha!  She found them on the porch from when I'd been pulling weeds since I couldn't find my proper gloves to do it with and thought they'd be the perfect addition to blow bubbles with - I think so too!!

I do hope you join us over at Skissedilla - check out what the other DT have been up to and we have a magnificent Selected Scrapper joining us this month as well!!

Take good care and enjoy your Sunday!


Friday, November 1, 2013

Mood Board Challenge ScrapFX - Spread Your Wings & Fly Mini Canvas

Happy Friday and November Sweetie Peeps!  Its been a bustling flow of craft activity around my house as I prepare for an upcoming Christmas market.  I've been having oodles of fun creating little delights I hope others will find joy in.  In the meantime though there has also been a wonderful flow of activity on the ScrapFX blog and YOU have the chance to get involved!


From now until Nov. 15 the above Moodboard is being used as inspiration for our current Fan challenge.  All you have to do is create a project based on it and you'll be entered in the running for some ScrapFX goodies and a Guest Spot on the blog.  Of course there is a slight twist - I mean what is a challenge without a little twist, right?


This sketch must also be used in the creation of your project.  Isn't it a fantabulous sketch?  You can use it as a launching pad for your design or follow it straight away - just as long as you share how you used it.  And before you ask, you don't have to use ScrapFX goodies in the creation of your projects.  We understand it may be tough yet for our fans to get their hands on the goods, so create away with what you do have and best of luck!!
 
Now for my 2nd project this month using this board.  I already posted my first here.
 
 
 I went with a cutie lil' mini canvas this time around.  I was highly inspired by the colors of the board and all the textures of the fabrics and the nest.  I also pulled a bit of inspiration for the background from the organic patterns found on those fabrics.  I did indeed use the sketch for my design but in this case I used it as more of a launching pad since my canvas was so small.  I pulled certain elements from the sketch and translated them to where the main items I used on the canvas would be placed.   
 
The background is made up of paint, mist rubbed on, stamping, stenciling with some paste and my fav ScrapFX stencil (Random Dots), a bit of pastels for highlighting certain circles, and gold mica flakes.
 
 
 I left the butterfly bare since there was so much color going on everywhere else and just coated it with some glitter glue.  When the glitter glue was added it actually deepened the color of the bare chipboard a tad and I really like the effect it gave.  The words were painted with some acrylic paint and highlighted with a white pen.  Doilies, sequins, and a rhinestone flower finished everything off.
 
This piece came together really quickly with the longest part being the dry time for the gold mica flakes - which actually don't take too long in the grand scheme of dry times - and yet it packs a punch.  Power to the mini canvases!!  So glad I have a bunch of these stashed away - can't wait to play some more with them.  What do you have stashed away that could be a hidden gem to play with this weekend?  Perhaps you could use it for your entry in to the challenge at ScrapFX.  Hope to see you there!!