Showing posts with label molding paste. Show all posts

Sunday, March 18, 2012

Today is a Big Day!!!

Hi Friends! I've been waiting for this day to come and now that its here I get to share some more EXCITING news....

Yours truly is now scrappin' with the Skissedilla gals as a DT member!!  The sketches these gals create are amazing I tell ya'..... and now I'll be throwing a few into the mix also!
  Today is the site's birthday ( Broggis' too!! Happy Birthday Broggis!!!) and myself, along with the two other new team members, have our first LOs up with the rest of the sweet, rockin' gals!!

Here's my first reveal:
Skissedilla #155
This page shows pictures of my kiddos first day of school this year - didn't go the whole first day route rather went with sharing a story about how I send a piece of my heart with them everyday - my new girlie Brit put that awesome frame around my LO - so cool, right?? - Thanks Brit!! xo
My journaling card - love those lil' tab stickers (this one is Crate Paper) - bits of Hambly overlays revealing stenciling done with Pan Pastels (<---seriously smitten with these), paint, and ink - texture paste rubbed through mesh tape with my finger - staples and stamping - the puffy sticker frames are K&Co. - changed the color of one by using VersaColor ink and then doodled with a Sharpie (the doodling was already there, just made it pop!)
My sub-title written on the photo - good shot of texture paste (<---I'll do a tutorial on how to do this soon!) - stamped and heat embossed brick - letters painted through a stencil
Lots of lovely layered bits of burlap, doily, tape, paper, button, overlays
So what'cha' think???  Are you so intrigued to see the sketch I made this off of??  I bet you are - so head on over to Skissedilla and leave a Happy Birthday shout out - come back here and let me know what you think of the sketch and I'll enter you to win an original canvas made by moi plus some other goodies!!!!  You can see the canvases here and I'll be adding pictures of my other goodies to give away today!  YAY!!!

March is shaping up to be such an amazing month!  Know what?? Its not over yet - oh yeah, I'll have another announcement on my birthday this week as well as my winners.  Keep your eyes peeled people, its about to get crazy up in here!!!

Have delightful days and be sure to go to Skissedilla!!!


Monday, February 6, 2012

A LO and a Card

Happy Monday Peeps.  Hope weekends were enjoyable and time with loved ones abundant.  Half of my weekend was spent watching DD play softball at an indoor tourney and the other was spent relaxing and scrapping, so all around a great weekend.  
 
Two of my favorite sites, MSW and Let's Scrap,  have lots of fun stuff going for the month of February so you'll wanna check them out.  Lots of awesome sketchiness and super fun prizes.... but the best part are all the ladies.  So many wonderful, inspiring friends to hang out with. 

I'm elated that I actually got going on Lucy Lou's Sketch-A-Thon.  Its been soo long since I played along there and it felt so good to knock out one of the 6 sketches that have been posted so far....I'm running a little behind LOL ; )  Here's a card I had a tremendously good time creating:
 
Chipboard, Molding Paste, Modeling Paste, Ink, and Shimmer oh my!  I don't think I'll ever tire grabbing for these supplies or using clouds, raindrops, and rainbows in my creations.


The background was created by using a combo of mists and ink to go over the patterned paper and pastes that were applied.  I altered up the chipboard with paint, pastes, shimmer, and glaze. Supplies Used: Sassafras papers and sticker, Maya Road chipboard and doily, Liquitex and Golden pastes, Crater's Workshop stencil, Studio Calico stamp, October Afternoon sticker
Here's the sketch:
Speaking of sketches check out this week's from Let's Scrap:
Suer fun with those strips of paper right?  The minute I saw those cloud shapes I was sold on having to get this one done.
One of my favorite Sassafras lines - Bungle Jungle animals in effect.  I highlighted the papers by brushing metallic paint over some areas and also adding puffy paint.  I heart puffy paint.  Some buttons for the giraffe and it was painted with some orange mist since I didn't seem to have any orange metallic paint.  I NEED to get some. A couple Maya Road pins, a Crate paper brad, and the hot air balloon is a stamp from Studio Calico.   Journaling done of cloud sticker made by Sass.


I've been holding on to this cutie lil helicopter for a long time and am so glad to finally rid it from my stash and onto a page.  I spruced it up a bit with some Perfect Pearls and added the brad so I could attach the twine for the banner.  Here you can also see the stars stamped on with gold paint and some of the mist splatters.
This LO while fun and playful really tugs at my heart strings.  Its all about how my boy (not really so much a boy anymore) finally outgrowing me.  He waited and waited for this moment, so elated when it came.  For me it was exciting to know he was growing up, but bittersweet knowing how quickly he'll be off.
Thanks for stopping by today.  Hope you've found something to make you smile, if not go do so, no time like the present.

Sunday, January 29, 2012

Out With the Old......

...... is the motto around my house these days.  I've been a cleaning lunatic and much to my body's dismay - mentally I'm a happy camper.  So imagine my delight when looking for a scrappy break I happened upon my friend Lisa's card challenge at MSW - out with the old; in with the new.  The concept: use old and new product.

stenciled molding paste colored with mist and embossing powder; bumpy textured created with watermark ink and embossing powder; mist splatters made with mica powder mixture
For my old contribution on this card I used my beloved Sassafras.... sigh..... the new stuff: mica powder, colored mesh, stencil.

1. misted molding paste, custom created embossing powder using mica powder for cloud stamp 2. bumpy embossing powder texture in upper left corner of notebook paper, mist splotches made with mica powder mixture 3. additional splatters, mesh, shimmery goodness  
 Short and sweet tonight folks, I'm pooped but have so much more to do tomorrow and need to scoot to bed.  Until next time......


Thursday, September 29, 2011

A Quickie

Hey, hey, hey. Just poppin' in quick to share a couple projects.

Simply Put


This was my uber fabulous hubbie's anniversary card this year. I started with a circle card base, adhered patterned paper to the bottom, and used a mask with colored molding paste at the top. I'll whip up a tutorial for how to do this technique soon. In the meantime I do have a step x step card published in Scrapbook News and Review Magazine right now to show you how to do it. Once the paste dried I added some gold mica flakes. Again this had to be set aside to dry. Gold mica flakes go quick though. After dry time I went to town embellishing with fussy cut images, sequins, cardstock stickers (love), pearls, and pins.

Confidence


I've tried and tried my best to get this photo to edit out right and the colors still look off to me, aww well, what'cha going to do, right?

This is a LO of my daughter pitching her 1st game of softball. Her coach had been asking and asking if she wanted to pitch and told her she was more than ready. She could only take the mound when she found the confidence in herself. I'm so glad I caught this moment of her first pitch.

I surprised myself by going real girly and less sporty with this page, but I think it works to really focus the page on the topic, which is confidence, rather than the act of pitching a softball.

Alrighty, moving right along. How about one more and then it's a done one for today.

Casting Crowns


This is a collage LO I created on my favorite band, Casting Crowns. It's a Christian band that rocks my soul. I did an image transfer from the insert that comes with a CD to have the image of the band in the corner and the silhouette to the right of it. I layered on tons of different elements and mediums to create this and I'll work on some breakdown photos if anyone would like to see that. Let me know, K?

All of the above projects were previously published in Scrapbook News and Review Magazine. Speaking of which, another event went live my friends. The Serendipity Stamps mini event is available on the forum. Lots of really cool ideas on how to use stamps by my fellow staffers.

Here's to wishing you a beautiful day. I'm enjoying the fact we have a couple hour window here with no rain. Gotta scoot my boot out and take care of chores before it pours, LOL.

Blessings ~ Scarlett


Friday, September 16, 2011

T.G.I.F.

For real! It's been a long, crazy, hectic week around here. Boy oh boy. Lots of running around, kiddos getting sick and banged up from sports, big people trying to hold it together, LOL! So anyhoo, I'm really thankful for today and the fact I don't have to set an alarm tonight!

Thought I'd pop in and share a couple projects and tell you about some haps upcoming for the weekend.

I must say my love for paints and all things messy just keeps growing and growing. I can't help but get giddy every time I open a jar of goop or reach for a new stamp/stencil. In fact I'm anxiously stalking the mail today because my new Crafter's Workshop stencils should be here.... well part of them anyways.... a couple sold out and will be shipped later, I couldn't wait! LMBO, it's bad. But, I ramble so on to the projects.

God Given Treasure


Lots of messy goodness going on here and I loved every second of creating it! I used a random ripped piece of cardboard for my base and began adding layers of paints, stamps, and other mediums to create a background. Then I built up from there with all my embellies and pictures.

Here's some deets:


The frames for the pictures are from Maya Road and I jazzed them up by adding some homemade glitter glue. The deer is stamped on Ranger sticky back canvas and then painted with some watercolors. The cloud is chipboard, if I remember correctly, that I painted and then added some molding paste to through a stencil.


This is probably my favorite portion of the LO. I love all the drippy paint, shimmer from mists, and how the bird turned out, although I wasn't sold with how it looked at first.


Aren't those little duckies adorable?! They're Sass Lass stamps stamped onto sticky back canvas and then watercolored. The letters were made using raw Maya Road chipboard and decking them out. I've got a tutorial in the magazine if you'd like to learn how to make them and if you don't have a subscription, you really should consider it.

Tree Tag


A quickly made tag with a painted background, some book paper, a decked out Maya Road chipboard tree, and some stamps.

All my shares today were pubbed in the June or July issue of Scrapbook News and Review Magazine. Be sure you make your way over there to see the Scor-Pal event that's live right now and be on the lookout for The Cat's Pajamas and Shimmerz this weekend! I'll have sneaks of my projects and some more full projects to share as well. You won't wanna miss it.

There's also the My Sketch World ABC crop going on. Sadly, I don't think I'm going to get to play this year, but if you're looking for a fun place to hang, be inspired, and crop....it's the place to be for shiggity.

Thanks for stopping by today, and a big Hey Gurl! to my new followers: Chantal, Heidi, Barb, Natasha, Veronica, and Dawn. I hope you find yourself getting creative at some point and if you don't think you have the time, make it. (insert a big cheesy grin here please).
~Scarlett

Friday, August 19, 2011

ATCs for Friday

Hi Friends! Happy Friday! Do you have big plans for the weekend? My DS has his first football game tonight and DD has some softball stuff, but other than that it'll be a relaxing weekend.

I have a bunch of ATCs, previously published in Scrapbook News and Review Magazine, I've not yet shared here so I thought that would be fun for today.

Spring is Here

Spring has been here and is gone, just like summer's about to be. YIKES! How did it go by so quickly?? To create this ATC, I started off by painting the base with some spring colors. Then I stamped over it with a script stamp and then again with a flower. After that I added the papers, flowers, and trim. I love those little felt flowers and will work on a quick tutorial for those today to share this weekend. I really want to get at giving you all some more tutorials and fun stuff throughout the week! WooHoo!

Dare to Be You

I must say when I made this ATC never did I imagine I'd love how the shades of purple looked. I do however and it's becoming a more used color in my world thanks to my BFFs hubbie. To create this ATC, I painted the entire base with shades of blue and magenta. This mixed into all the purple shades you see. Then I spread some light molding paste through a negative punch of a butterfly and some faux punchinella I created with a hole punch. Then I went over with paints again. Next I added lots of glitz and shimmer with some Perfect Pearls. My BFF hooked me up with some amazing colors and they are outta this world! I dusted the PP on the butterflies as well as little dabs here and there over the whole piece. To adhere the star confetti, beads, and the bling, I used some gel medium.

Rock Star

This was such a quickie! I brushed on some red paint, went over with white paint on bubble wrap, attached the corrugated cardboard with gel medium, added black paint and embellies and I was done.

Fly Away

This one emerged from some playing I was doing with light molding paste. I wanted to try out carving into it and creating a background. First I laid down a generous layer of light molding paste and then carved my cloud shapes in it. I set this aside and let it dry overnight (24 full hours to be exact) then I went back in and added paint and some Diamond Dust with gel medium. The last touches were the butterfly and writing the words fly away. I love Sakura pens! I was amazed at how well it wrote over the painted paste.

Well before I leave today, I have a few questions for you. I really want to beef up my blog and have this be a place where you can come for inspiration, how tos, and more. In order to do that, I'd love some input from you all! =)

What would you like to see more of on this blog? Scrappy stuff, tutorials, mixed media stuff....

How many times per week would you like to see new posts?

Tell me something about yourself. I'd really like to get to know who stops by.

If you can take just a few moments and share what you're thinking I'd be beyond elated. Like I said I really want my blog to become more interactive and less just eye candy posts. I have lots of ideas (some in the works already) and would love yours!

As always, thanks so much for stopping by. Have beautiful days with much laughter!
~Scarlett


Thursday, August 18, 2011

New Issue Available, Some Projects, and Weekend Haps

Hey Everybody! Well it was a little longer than a day, huh? BUT at least it didn't take more than a week for me to get back here. LOL

I've got lots to share and don't want to keep you reading on forever so let's get started with the new issue of Scrapbook News and Review Magazine that is available for your viewing pleasure. Each issue is chock full of eye candy and inspiration, tutorials and article, and more! There are all types of projects from scrappy pages to cards to mixed media delights. Here's this month's cover:


You get all of the above for only $4.99 a month and what's great is you can view the last 3 months of issues as well. If you're worried about being able to save your fav articles or tuts, have no fear! You can right click and save anything you'd like. So what are you waiting for?? Head on over to Scrapbook News and Review Magazine and pick up your subscription today!

Now some projects!

I've really fallen head over heels in love with doing canvas work. In fact each month in the second issue (yep that's right, 2 issues per month!) I do a step by step breakdown of one so you can try it at home! Let me know if you check it out. The canvas I'm sharing today however was for a call using deco scissors. Deco what? you say. Yeah, deco scissors. I had to blow the dust off mine, but am soo happy I did. Check out the project:

Say a Little Prayer


All the patterned papers I used on this piece were cut with some type of deco scissor, with the exception of the fringe at the top. That was done with the Martha Stewart fringing scissors. Are those consider deco? Hmmm... anyways, I made this canvas for my DD. It has special meaning to us and she was elated when she saw the outcome. Now to get her room revamped so we can hang it up.

Close up:


I had to share a close up of the birdie's legs. They're my favorite part of the piece, LOL. I made them by taking some beading pins and putting beads on them. I created a loop at the bottom to hold the beads in place and attached a jump ring. From the jump ring hangs two tear drop shaped gems from Maya Road though they're hard to see in the picture. For me this was the perfect touch of whimsy to make this project special.

Up next a LO:

In My Life


This LO was created for a fussy cut call. The October Afternoon 5 and Dime papers worked perfectly for this. I love all the little farm paper dolls and animals. I used lots of paints, pastes, gesso, and other textural elements. In my life I've had all the animals in the pictures as pets. What makes it hilarious is that it's only been within the last years I've actually lived on a farm!

Here are a couple close ups:


And finally a card:

Much Thanks


Much thanks first and foremost to all my friends that stop by here. Your comments make my day and I love knowing when someone's visited. So thank you all for stopping when you do.

I created this card based off the card sketch for SNR (yep there's sketches in every month's issue) and while my take always seems to go a stray from the sketch I love it anyhoo. Used lots of paint, gesso, light molding paste, stamps, tapes, and more to put it all together.

Now on to some upcoming haps at Scrapbook News and Review. I don't know if you know, but there is some majorly cool stuff going on over there! SNR has hooked up with a number of manufacturers and every Wednesday and Saturday there are events going on to showcase inspiration, classes, and tutorials. It is awesome to say the least. This weekend Prickley Pear Stamps and Nikki Sivils will be featured and last night SRM stickers went up. You can also view We R Memory Keepers until Saturday when it'll be taken down. Oh and did I mention there are a TON of prizes you could be entered to win?? They're good too, on the real. So be sure you make your way to SNR you won't want to miss out.

Phew, a little long winded huh? Thanks for sticking with me. Hope you have beautiful days!
~Scarlett

Friday, July 8, 2011

Projects to Share

I love being a part of the Scrapbook News and Review staff. I have been pushed creatively and love every minute of it. I create like a lunatic each month and have so many wonderful projects I'm always dying to share here and before I can I'm all caught up in creating more.....giggling......so I thought I'd try and get some of those posted today to share. I'm not going to do detail shots, but if you'd like to know more about any of the projects I share feel free to email me. I'm going to add a contact link on my sidebar. I think this will help me feel like I can share more because I won't be going back to old projects and trying to edit out new pictures. So let me know what you think. Do you want to see deet shots and bit of explanation here or would you rather just see some projects and ask questions if they pop up?

Phew, chatty today aren't I?! On to the creative business at hand.

Discover


This is a wordless LO I created for a one word title call. It's made on sticky back canvas and basically the only things I used to create this were: paint, buttons, UTEE (the letters), glitter, and a few rhinestones.

Fly Away


This is an ATC created for he Strut Your Stuff call. This was such a fun project to work on. The background is molding paste I carved into with a chopstick I believe. The sprinkled some glass glitter on it and let it dry. Once it was dry I painted over certain areas and added the butterfly with some heavy gel.

Debutante


This card was created for a sketch call. I think by the time I was done, my card may not have looked much like the sketch any longer, but the basic design is there. I wish the pictures of this card could show all the additional mediums that were used to change up the papers and add texture and glitz. I used pearl ex on the papers to highlight certain areas, my own glitter glue mixture for the wings, embossing powder, and Sakura glaze pen for the crow. It's really gorgeous in person.

And how about a set of inchies to end with. They're so cute and fun to do!

Birds and Bees


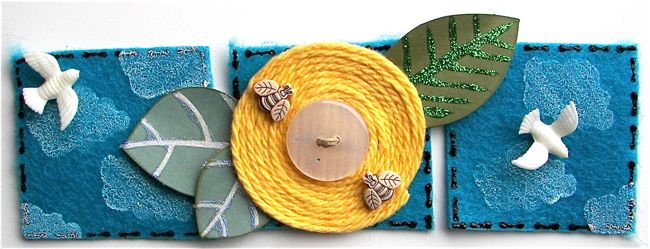
These were done for a fabric background call. I used felt and stamped on it with a stamp I carved myself along with paint. Then I outlined the squares with faux stitching using a puff paint. The flower is made with yarn on a cardstock circle base. Add a few birds and bees along with a button and called it a day for these. I think they're totally adorable.

Alright, well there you go. Some new projects to check out. Hope you enjoy looking at them, let me know what you think. I'd love to hear from you. Be sure to head on over to SNR. There's a great forum to join in on, fabulous front page projects, and of course the magazine itself is off the chain!!! For real. If you don't have a subscription, I have no idea what you're waiting for!!!!

Have a great day!


Sunday, July 3, 2011

Finally

a post! WooHoo! My poor neglected blog. My intentions are always good, just not always seen through...wink.... So thank you for bearing with me and dropping by when you do. I have some exciting things planned ahead and I am hoping life will align to make it all happen so I can share with all of you! In the meantime, what I can share is my 2 creations for My Sketch World's July card and LO sketch.

First up the card sketch. Here it is:

Fun sketch, right? Here's my take on it (an ATC of course....cheesy grin):

Hug Your Kids


I really am diggin' these new papers (Odds and Ends) by Cosmo Cricket. My favorite are all the little girls and the words. The background for this ATC is a crinkled cardstock background with some Perfect Pearls dusted on. Love how the patterned paper picked up some of the texture, but not all. I put my Cuttlebug to work with some dies for the burlap and felt.
Here's a different angle:


Next up the LO sketch:

Another good one, huh? Miss Lucy rocks out the sketches that's for shiggity!

Here's my take on it:

No More Waiting

I rotated the sketch to the left and love, love, love how this turned out! I really think I have finally found my mixed media mojo when it come to adding it into my LOs. I had so much fun creating this it's insane! I used lots of different manufacturer's items to create this freestyle whimsical page.
Here are some close ups:

Lots of bellies both store bought and hand made. For the tree I created the leaves with a die and then added texture paste to the chipboard trunk. I used Shimmerz on the clouds and sewing paper, and love how the twine circle on the photo turned out.


My molding paste butterfly with some glass glitter. I used a Tattered Angels glimmer screen and spread the paste through. Thought this was a fun replacement for the circle on the sketch.
One more funky angle for ya':

Be sure to hop on over to MSW so you can play along with the sketch challenges and all the other challenges the DT have posted right now. Lots of great ones!

Until next time (which is hopefully sooner than this was), have a beautiful evening, hug your kids, hug your hubbie, and be blessed.


Wednesday, May 4, 2011

Hodge Podge

Hey there! It was one of those days today where when it's all said and done, you just need a way to decompress. I thought and thought about what I could do and it struck me....I haven't blogged on way to long......again....so I'll do that and then hit the hay.

I have a hodge podge of projects I have created for Scrapbook News and Review Magazine. Let's roll!

ATC

Change


This ATC is among the first few I did where I really got messy and explored with a variety of mediums. I used gesso for the background to get a bit of texture going. Then I painted over it and adding some molding paste through a stencil. I sprayed the molding paste with some mists to give them color and to alter the color of the background some. The last step was adding a quote and some bling.

Layout

Isn't All That


This LO was created for a call about your little secrets. While it's no secret I'm a skinny minnie, the reason why isn't all that glamorous at all. I mixed and matched manufcaturers to my heart's content on this page. October Afternoon Thrift Shop, Crate Paper Restoration, Sassafras Lass Indie Girl, Maya Road goodies galore, a few Prima flowers, and a few other things from my stash.

Inchies

What's not love about these fun little creations?!


The background for these is some dictionary paper covered with PearlEx paint I mixed up. The bird stamp is from Unity on October Afternoon Fly a Kite scraps...love this line and am still using scraps of it here and there. The little button brads re Making Memories.

A Card

I must say this is one of my favorite cards I have created lately!

It's Owl Good


For this card I used some October Afternoon Campfire papers along with Crate paper's woodgrain from restoration. I used my Sissix Tim Holtz embossing folders to get texture for the tree. The chipboard is is October Afternoon and Basic Grey. My favorite part is the stamped owl and sentiment. They are Studio G.....you know from the dollar bin at Ms?! The owl is stamped on some sticky back canvas and then I used paints to highlight it.

Finally an art journal page

Right Now


A few posts back I posted the base for this page. To see all the knitty gritty details, you can head on over to the SNR front page, look under Mixed Media tags, and it'll be there.

Alrighty, this was a long post so thanks for hanging in there with me. I so appreciate each time you come to visit and love reading your comments.

God Bless you and yours.


Saturday, December 25, 2010

Merry Christmas Friends!

Hope your day has been filled with lots of love, joy, and laughter!!! May blessings be bestowed upon you and your family in the New Year!

This tag tutorial was created for Scrapbook News and Review Magazine's 12 Days of Christmas Tags. Hope you enjoy!


Joy by Scarlett Salamone Supplies Patterned Paper: Echo Park; Mix Media Paper: Canson; Cardstock Stickers: Echo Park; Snowflake Buttons: All Dressed Up; Pearls: Recollections; Extra Heavy Gel: Golden; Matte Gel: Liquitex; White Opaque Flakes: Golden; Light Molding Paste: Golden; Glitter: Martha Stewart; Paint: Tulip; Punches: Marvy, Martha Stewart; Tool: Crop-A-Dile: We R Memory Keppers; Other: Sequins; chipboard, trim

Step 1:


Gather supplies together.

Step 2:


Cut Mixed Media paper to 6 1/4 x 3 1/8. Adhere Mix Media paper to chipboard using Matte Gel.

Step 3:


Cover paper with a coat of gesso. Set aside to dry.

Step 4:


Punch a strip of patterned paper with border punch. This strip should be about twice as long as the width of your tag base.

Step 5:


Cut punched strip in half and adhere to top and bottom of tag base with matte gel. Set aside to dry.

Step 6:


Punch 3 circles, in varying sizes, out of patterned paper.

Step 7:


Cut circles in half and trim edges to fit onto tag, creating hills. Using Extra Heavy Gel, adhere the hills to the tag. Set aside to dry.

Tip: To achieve some dimension, vary each layer of gel's thickness. The thicker the layer of gel you apply, the longer you will need to allow time to dry.

Step 8:


Cover tag with White Opaque Flakes. I used a flat brush to apply. Set aside to dry.

Step 9:


Adhere snowman and tree to tag using Matte Gel. The thicker layer of gel you use, the more dimension you will achieve. Remember a thick layer of gel will take a longer time to dry. My layer required 24 hours to dry completely.

Step 10:


Add a thick layer of Light Molding Paste to the base of the snowman, tree, and hills with a popsicle stick or your choice of tool. To apply a dusting of molding paste to your hills and tree, use your finger to dab on. While molding paste is still wet, sprinkle some glitter on to it.

Step 11:


Adhere the last of your embellishments (bird, joy sticker, and snowflakes) to the tag using Matte Gel.

Step 12:


Use your Crop-A-Dile, or other tool, to punch a hole in center of tag at the top. Add trim.

Step 13:


Enjoy your completed tag!