Showing posts with label Graphic 45. Show all posts

Wednesday, October 5, 2011

Plain Crazy

It makes me feel old every time I think how quickly time goes by. Do you know what I mean? Like when I was younger I listened to 'older' people say this all the time, "time goes by so fast." Me, being the youngster, thought time couldn't go quickly enough (mind you I was a rather awkward teen, LOL). Anyways, it's plain crazy to me we're already into October, where did the year go? It's plain crazy to me my son is going on his first real date this coming Friday. What happened to this mama being the only gal he needed? It's plain crazy to me my daughter has almost the same size foot as me and can share some of my clothes. What does she think is going to happen when I find out she snuck some of my clothes out of the dryer into her room (oh yeah, it's bad. LMBO)? Time goes by....quicker than we think.....I blinked and all this stuff happened, plain crazy I tell ya'. What's plain crazy in your world these days? Do share.... I need to know I'm not the only one. ;0)

Alrighty, so the theme of this post is plain crazy. Let's see what projects I have stashed away to share that might fit the bill.

Oh the Things You Can Think


This was a totally fun ATC to make. I started with a shredded paper base and built up with an image transfer, staples, beads, mini confetti, and text. The image is from Graphic 45s Steampunk collection; I love how well patterned paper works for transfers.

Seek It Out


This is a quirky lil' canvas I made. If I remember correctly it's 5x5, by I'm not completely sure on that. I had a great time mixing bold colors and patterns. I'm also pretty pleased with all the scraps I've been using up on canvases like this one. Does my heart good knowing I saved ALL those snibbles for good reason, ROFL.

BBQ at Claw's


I created this LO on a paper bag. I covered it with some geso first and then went to town layering paints, papers, stamps, ink.... you name it and it's probably on there somewhere. What I think is cool is how there's a lot of dimension to this LO, but not a lot of bulk. Very new concept for me, LOL. I even used machine stitching!!!!...... also very new to me.

So there you go some crazy projects and info from me for today. All the above projects were previously published in Scrapbook News and Review Magazine. Have you been to the site lately? There are new events live and ready for your viewing pleasure. Serendipity stamps, Technique Tuesday, and Jenni Bowlin are all going strong and loaded with tutorials, classes, and inspiration.

I've got some stuff posted for Jenni Bowlin, including a tutorial on how to layer papers, mediums, and textures. Go check it out; I think you'll like it.... at least I hope you do.

Hope the day treats you well, it is what we make of it, right? It's supposed to be gorgeous here today so I'm going to make sure I enjoy it while I can....I'll be doing chores, but at least it'll be warm and sunny.
~Scarlett


Friday, July 8, 2011

Projects to Share

I love being a part of the Scrapbook News and Review staff. I have been pushed creatively and love every minute of it. I create like a lunatic each month and have so many wonderful projects I'm always dying to share here and before I can I'm all caught up in creating more.....giggling......so I thought I'd try and get some of those posted today to share. I'm not going to do detail shots, but if you'd like to know more about any of the projects I share feel free to email me. I'm going to add a contact link on my sidebar. I think this will help me feel like I can share more because I won't be going back to old projects and trying to edit out new pictures. So let me know what you think. Do you want to see deet shots and bit of explanation here or would you rather just see some projects and ask questions if they pop up?

Phew, chatty today aren't I?! On to the creative business at hand.

Discover


This is a wordless LO I created for a one word title call. It's made on sticky back canvas and basically the only things I used to create this were: paint, buttons, UTEE (the letters), glitter, and a few rhinestones.

Fly Away


This is an ATC created for he Strut Your Stuff call. This was such a fun project to work on. The background is molding paste I carved into with a chopstick I believe. The sprinkled some glass glitter on it and let it dry. Once it was dry I painted over certain areas and added the butterfly with some heavy gel.

Debutante


This card was created for a sketch call. I think by the time I was done, my card may not have looked much like the sketch any longer, but the basic design is there. I wish the pictures of this card could show all the additional mediums that were used to change up the papers and add texture and glitz. I used pearl ex on the papers to highlight certain areas, my own glitter glue mixture for the wings, embossing powder, and Sakura glaze pen for the crow. It's really gorgeous in person.

And how about a set of inchies to end with. They're so cute and fun to do!

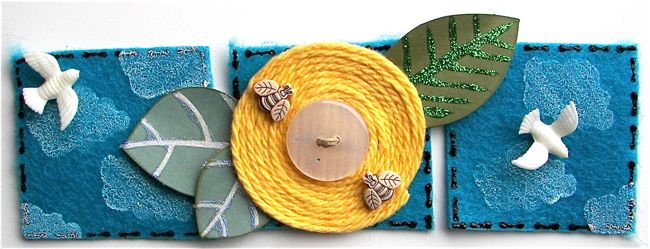
Birds and Bees


These were done for a fabric background call. I used felt and stamped on it with a stamp I carved myself along with paint. Then I outlined the squares with faux stitching using a puff paint. The flower is made with yarn on a cardstock circle base. Add a few birds and bees along with a button and called it a day for these. I think they're totally adorable.

Alright, well there you go. Some new projects to check out. Hope you enjoy looking at them, let me know what you think. I'd love to hear from you. Be sure to head on over to SNR. There's a great forum to join in on, fabulous front page projects, and of course the magazine itself is off the chain!!! For real. If you don't have a subscription, I have no idea what you're waiting for!!!!

Have a great day!


Sunday, October 31, 2010

Happy Halloween! A tutorial treat for you!!

Hope your day full of treats today!! I thought I'd share one of my own for all my blog friends out there.
I created a simple canvas project for Scrapbook News and Review Magazine's Halloween newsletter. Here's the tutorial I posted:

Here is a simple canvas project you can do during this wonderful fall/Halloween season that can hang in your house all year long! I would like to note before the tutorial starts I got the idea to mix black gesso and glitter together from a friend on the forum in the mixed media section. It was a fabulous tip and I have been going crazy with it since. So a big huge thanks going out to that special friend!


Afraid To Do by Scarlett Salamone Supplies Patterned Paper: graphic 45; Gel Medium: Golden; Gesso: Liquitex; Paint: Ranger; Mist: Tsukineko; Glitter: Martha Stewart; Other: Gauze, Canvas

Supplies Needed for this Project:


8x10 Canvas
Patterned Paper
Gesso
Gel Medium - Matte
Paint
Gauze
Silver Glitter
Mist
Paintbrushes
Pop Dots

Step 1:


Squeeze some black gesso into a bowl and add a generous amount of silver glitter to it. Mix together.

Step 2:


Paint black gesso/glitter mixture onto canvas. Allow to dry completely. Store leftover mixture in a sealed container for later use in this project. Tip: Do not go over your brush strokes too much while doing this. The glitter will not show up as well.

Step 3:


Take out leftover black gesso/glitter mixture and add white gesso to it. Mix together to create a shade of gray you are pleased with.

Step 4:


Take 2 strips of gauze and dip small portions of it into your gray gesso mix. Once the gauze has some color on it, roll it around in your hands to form a ball. This will help to spread the color throughout with out over saturating it. Allow to dry completely.

Step 5:


Once gauze is dry, spread open a surface and mist with silver.

Step 6:


Adhere gauze to canvas using gel medium.

Step 7:


Cut out images from patterned paper.

Step 8:


Cut 2 strips of paper 2x3" and rip down to a size that will fit between your gauze strips on the canvas. Curl back the edges on one side of the strip.

Step 9:


Take an image (rectangular in shape) from your patterned paper and adhere it to the canvas using gel medium. Place the strips you have created along the edges of it and adhere with gel medium. Go over patterned paper with gel medium to create a seal. Note: You will have to tuck and lift up your gauze a bot to get the patterned paper image and strips to fit snugly.

Step 10:


Go over cut out images with gel medium. Add pop dots to the back and adhere to canvas.

Step 11:


Grab your paints, take the daubers off if you are using this kind, to add the moon, quote, and some light steaks throughout. Tip: Write your words in black marker before you try painting them on.

Step 12:


Hang up your canvas and enjoy!

Thanks for stopping by today!

Wednesday, September 1, 2010

It's September!!

ACK!! Where did the summer months go? It just flew by soo quickly and school for my kiddos is just right around the corner. I will have a freshmen in highschool!! and a 5th grader. Sigh..... I wish I could turn back the time to when they were little. They have grown too fast!

Ok, moving on to some scrappy stuff. With the first of the month comes some reveals for me to share.

My Sketch World has new sketches up for both LOs and cards. I am on the card team and am loving the fact I get to do ATCs, tags, arches, or cards with Lucy's sketches. I have really gotten into trying out some new things and having one of her fabulous sketches as a starting point is a great help!

Here is the My Sketch World card sketch for the 1st:

Isn't it wonderful??! This sketch just screamed ATC to me so that's exactly what I created.

I Sing:

This little birdie needed some help one day when it got stuck in the side of a kennel outside in our driveway. DD and I enjoyed looking at the little fellow and trying to help him find his family again. This picture reminded me of the gospel song His Eye Is On the Sparrow; it is one of my favorites.

head on over to My Sketch World to see the rest of the fabulous designers takes on the sketch, as well as the new LO sketch and inspiration. There is also still time to get some projects done for the ABC crop, so if you haven't checked that out do so while you are there too!

The 1st of the month also means A Walk Down Memory Lane is featuring some new manufacturers of the month! This month the designers will be helping showcase the wonderful products of Graphic 45 and stamps from Stampendous!! You can receive 25% off both of these manufacturers products. Also remember if there is something your little heart desires that is not in the store, just let Lisa know and she can order it for you!

Remember yesterday's sneak peek?? Well here is the full card:

MMMmm, I used some yummy new Steampunk from Graphic 45 on this card! I have been doing a lot with this line both the 8x8 size and 12x12. The colors are soo rich and I really love all the cool patterns and things you can cut out! To create this card I used fabulous sketch from the beautiful Kimmy over at Let's Scrap. She always has great card sketches from us over there once a month. Here is the sketch:

So there you have it, 2 great sketches for you to use as inspiration and 2 great new manufacturers to save on this month.

Thanks for stopping by today. Hope your day is filled with happiness and God bless!
Scarlett (Still trying to figure out how to get a siggy, but I WILL figure it out! LOL!!)


Wednesday, June 9, 2010

Sketchy Wednesday

Hi There! Hope you all are having Happy Wednesdays!

I love that I get to be a part of 2 great sketch communities. Sketches make it so easy and quick to create beautiful LOs and I feel I follow along with 2 of the best sketch artists around in Lucy, from My Sketch World and Cheri, from Let's Scrap! Right now both sites have fabulous sketches up to kick start your June mojo!

Here is the June 1st Sketch from My Sketch World:


My LO is titled Beach Baby

I used Graphic 45 Boardwalk papers for this LO! I am lovin' the colors and fun patterns of this line!

WooHoo! I finally used some bottlecaps on a LO! I have only done this once and look forward to using these gems again! I used my circle punches to punch a base background paper and the little soda cap images from the patterned paper for inside the bottle caps. The little saying is also cut from the papers.

Here you can see the bottle caps a bit better, as well as my dyed eyelet lace. I used my glimmer mist on it. I used a Jillibean Soup journaling sprout and distressed it with my Ranger inks to make it match the papers, instead of being shockingly white.

I wanted my tickets to look more realistic on the page so I had the idea to create these lifts in the line. I really like the way it turned out. Using sandpaper, I distressed my Thickers to have them match the overall feel of the LO.

Here is the sketch from Let's Scrap:

Cheri always provides 2 page sketches and I love that they work so well by themselves or together. My preference is to do one pagers so I chose the left side of the sketch..... I mean how could I resist that circle!! LOL! It's my favorite scrappy shape!

This LO is titled Love Makes.....

I really love this picture of DH and I. It is so rare that we actually get a picture together, so thank you to my DD who took this picture last year on the 4th of July. I used a lot of scraps I had of some of favorite lines from some of my fav manufacturers to create this LO.

I outlined the letters for GO with a Sharpie to make them pop out and I told you this accordian fold flower was quickly becoming my fav to use! I inked the chipboard bird, outlined it, and then embossed it with UTEE to get a nice sheen.

I used up lots of random bellies and stickers, just love that big ol' pink button.... yup it was a button, just took off the backing.

I again dyed some eyelet lace for this LO and created the chipboard heart myself out of some plain chipboard sheets I had, then glittered, and used hairspray to seal.
Thanks for stopping by and taking a look at my creations. It's always so fun to share.
Make sure you head on over to Let's Scrap and My Sketch World to complete these sketches. Both sites have great prizes connected with them this week!
Until next time, Happy Scrappin' ~ Scarlett


Friday, April 30, 2010

May 1st Sketch.... a little early!!

Hooray!!! With all the fun and excitement kicking off for National Scrapbooking day, Lucy at My Sketch World posted the May 1st Sketches early!! They are so fantastic and the entire DT rocked them! Be sure to head on over to MSW to check out all the fabulous creations! And while you are there you need to make sure you check out the Spring fling crop that is starting tomorrow!! I am having some technical difficuties right now with my blinkie, but will get it here soon to remind you of the fun going on ALL month at MSW!!

Here's is my take on the May 1st Skecth:

Thank You


I just love the Domestic Goddess line by Graphic 45. The colors are so beautiful and the patterns are fun!

And a couple close ups:


My favorite thing to do with this line is to cut out all the fun vintage inspired pieces.


The pearls added a nice, elegant touch and pop dots helped to give the peachy squares I cut some dimension.

Thanks for stopping by and be sure to check back tomorrow when I have my first blog hop challenge ever posted for A Walk Down Memory Lane!

Sunday, February 21, 2010

MSW Sketch-A-Thon LO

Well, all the sketches are posted at My Sketch World and now it's time to kick the scrapping into gear!!! I have only made it through 5 sketches so far and I have 15 more to go!! That is if I only want to do one round...... there is also the option to do all the sketches a 2nd time creating a LO with a card sketch and vice versa!! That would total 40 projects by March 3 when everything has to be uploaded!

Here is what I came up with for the LO sketch #5

Life's a Journey:


I just love how this LO turned out! It is going to be hung up somewhere around here. I used all Graphic 45 patterned papers.

Here's a couple close ups:


The letters I used are from Jillibean Soup and October Afternoon. The lace and ribbon are The Paper Studio.


The stick pin is MM and the card is from October Afternoon. I inked it up with Walnut ink to age it and then crumpled it up. The pearls are Recollections and the buttons are from Basic Grey. There is still plenty of time for you to join us over at the Sketch-A-Thon so be sure you get on over to MSW and play along!!!


Thursday, December 31, 2009

New Year.... New Sketch!!

First I want to wish all my friends out there in blogland a belated Merry Christmas and a wonderful New Year! I have been enjoying wonderful time with my family while catching up on rest and relaxation from work! I pray God blesses you each with the coming year and makes His presence known in your lives. The only resolution I will make is to try and Honor Him more throughout the coming year and help spread His light through my actions!

Now on to the new sketch!! It's at Let's Scrap and it is a super cool one!! I love how you are able to create a scene with it!! Right up my alley!!! You should also head over there to check out the DT call info.!!!

Here is the sketch for this week:


And here is my take on it..... I only did the right side of the sketch:


This is my DD and her cousin at my FILs house on Christmas Eve. Every year Grandpa and Grandma give them a pair of matching pjs; they change into them right away and then get right back to playing!!!

I used a mixture of papers from Graphic 45, October Afternoon, and Cosmo Cricket. The bellies are also a variety; they range from October Afternoon, Cosmo Cricket, Bazzill, Maya Road, and Martha Stewart.

Here are a couple close ups:


for the word cozy, I use naked Maya Road Chipboard and added flocking powder. I used a glossy medium as my glue. The same glossy medium was used on the brackets.... I must invest in better brushes to eliminate brush lines!


For the little puffs of smoke I used some fuzzy ribbon. I just kinda rolled it up and shaped the way I liked then used a bit of glue.

The sponsor this week is Scarlet Lime, so I hope to see you head over and join in the fun!!

Thursday, November 26, 2009

Happy Thanksgiving

Happy Thanksgiving to all my scrappy pals out there in blogland!! I hope your day was filled with love, family, food, and thanksgiving! The Lord has been soo good to my family I just cannot express! We have soo much to be thankful for and it's nice to just take a day and express that thanks to Him!

Today also marks the beginning of the Christmas season!!! YAY! With all the sales going tomorrow, decorations going up, and Christmas shows and music playing I am in the full Spirit of the season!! I have decided this year I really want to show the true meaning of Christmas to my kids..... yet again.... it is soo hard as they get older to help them focus on the giving part, rather than the receiving when society and their peers are telling them they need to be asking for the latest and greatest stuff. Well, around here, it's going to be a homespun Christmas!! Now, don't get me wrong, I am sure my children will have some beautifully wrapped store bought presents under the tree, but leading into that they will help prepare many hand crafted gifts, baked goods to fill them, and decorations for our house, as well as others!

So, I thought I'd share the first gift I have completed. I made this for my DHs sister. They lost their mom quite a few backs now and I have always been soo sad I never met her. I hear them share the wonderful memories they have of her and look at all the wonderful things of this world she left behind and just know she was a beautiful woman inside and out! My SIL has soo many recipe cards because her mom liked to collect recipes. She has them stored on teh bottom shelf in a cupboard and always talks about how she just can't get rid of them, but they are useless where they are at. So I decided to help her solve this problem by making an irresistible recipe box. I know this will be the perfect thing to hold all the memories.

Recipe Box & Dividers


I was soo pleased with how this turned out!! I regret that I didn't take a before picture, but I do have a smaller version and may just take a picture of that and then update this. The wooden box I used was a plain wood color and I think it was supposed to be some sort of bug box. The cards are chipboard from Fancy Pants and 1 was created myself using a 12x12 piece of chipboard I had.


This is the front of the box. All of the papers I used are from the Domestic Goddess collection by Graphic 45. I just picked this up recently at my LSS (see side bar) and I am in love! There is soo much potential here for soo many cute projects! The letters used are this are from AdornIt.


This is 1 end of the box. Again the papers and the tag are from the Domestic Goddess Collection and the button is from Foof-A-La. They have these great sacks of buttons I picked up at my LSS and I am soo glad I did! I have used them a lot and so has DD!


This is the back of the box.


This is the other end of the box.


This is the top of the box. I fussy cut the flowers out of the patterned paper, inked and curled the edges a bit, then added the dressed button for the center. I had no idea how I was going to age up the look of this box to match the papers when I started this project..... and then it hit me..... INK! Yup, I used my handy dandy ink pad and just went to town to create the look I was content with!


These are the divider cards up close for the inside of the box. Most of the papers used are again from Graphic 45, but there are a couple of Cosmo cricket things in there too! I used a prima flower as well as a fussy cut one..... this time with the other side of the patterned paper showing. To age the chipboard, I used my ink pad. The tabs were from some ribbon scraps.

I cannot wait to give this to my SIL in the next couple weeks for her birthday... we don't do adult gifts at Christmas anymore, so she will get this soon! :0)