Showing posts with label gold mica flakes. Show all posts

Tuesday, December 3, 2013

Christmas Blog Hop!! ScrapFX & Scrapbook Creations

Hi There!  If this is your first time to my blog, welcome so glad to have you and of course I'm always elated to have my friends stopping by!!  I'm very excited to be participating in this special Christmas Blog Hop with Scrapbook Creations Magazine and ScrapFX so on with the show.

Another month, another blog hop! This time Scrap FX and Scrapbook Creations have partnered up to bring you this very special chipboard Christmas celebration! But before we get onto the actual hop, let me show you this! 

scrapbook creations blog hop

What is this, you ask? THIS is the prize you could win (a pack of delicious ScrapFX goodies and a digital SC subscription), if you join in and play along. It's easy enough to be in with a chance to win-- simply comment on my post, click on the next blog in the list, comment on their blog hop post, and repeat until you've completed the entire list! (Make sure you do check out the inspiration--it's all brilliant!) (The blog hop ends next Wednesday, 11 December, at midday Australian Eastern Daylight Savings Time. For my US friends this is actually a Tuesday, December 10th end date so be aware of that.) 

Here is my inspiration for you:

Reindeer Ornaments

These little ornaments were created on mini canvas panels.  I used the ScrapFX Random Dots Stencils (2013172) to add texture to the painted background.  While the paste was wet I sprinkled it with glitter and sealed this with a fixative to ensure this sparkle will last throughout the years.  The little Reindeer (2009349) were the perfect embellishment to add on top with some glitzy antlers and bling nose for simple touches.


Here you can see the texture and detail a bit better.  This is such a quick and easy project and would look great attached to a gift.

Peace On Earth

Another 6x6 mixed media canvas using the Moroccan Tile Stencil (2013352) to build the background and featuring some of the cute mini chippies ScrapFX now offers!  The Mini Flying Wings (2013232) worked wonderfully for this Peace on Earth message using the Itty Bitty Bets - Typewriter font (2005103) letters.  The flourish with the holly (Holly Flourish - 2012257) as the backdrop added an elegant touch and was altered with paint, mist for the holly leaves with a brush, and glitter glue for the berries.

Merry Christmas Tag


This tag will be going in my December album and I adore the fun touches I was able to add by using up bits from my stash and some fun little ScrapFX Christmas pieces.  The Christmas Stars (2007387) and Mini Christmas Trees (2007384) will surely be getting a workout in my projects this season but what is truly fabulous is they really can be used all year long!  

And with that I wish you all a Happy start to the Christmas season!!  I do hope you've been inspired to get going on some fun projects of your own.  Below you will find where to head off to next!

The list: 
 Misty R 
 Scarlett S (You are Here!!!)
 Anita B 
 Geli D 
 Cindy P 
 Maria S  

Happy Hopping!

Wednesday, November 27, 2013

Give Thanks Canvas

I'm ever thankful for the many blessings in life and with Thanksgiving soon upon us here in America I thought it would be fitting to share how thankful I am for each and every one of you, my creative friends, that come here and visit.  

For you I.....

for all the encouraging words, sweet notes, laughs, and hugs sent through cyberspace.  For cards, packages, tags, and happy mail sent.  For friendships built and prayers uplifted, I give thanks to you.  These are things I cherish and could have never expected when I dived on in to the online world of scrapbooking/blogging some years ago.  It never ceases to amaze the kind hearts of papercrafters near and far.  

As you head in to Thanksgiving I wish you a blessed day with your family, and the same even if you won't be celebrating this feast.  May you be reminded what a treasure you truly are.


May you have time to just be still and thankful for all the wonderful blessings you have right here, right now.
Take good care and Happy Thanksgiving!
ScrapFX Product Used:


Friday, November 1, 2013

Mood Board Challenge ScrapFX - Spread Your Wings & Fly Mini Canvas

Happy Friday and November Sweetie Peeps!  Its been a bustling flow of craft activity around my house as I prepare for an upcoming Christmas market.  I've been having oodles of fun creating little delights I hope others will find joy in.  In the meantime though there has also been a wonderful flow of activity on the ScrapFX blog and YOU have the chance to get involved!


From now until Nov. 15 the above Moodboard is being used as inspiration for our current Fan challenge.  All you have to do is create a project based on it and you'll be entered in the running for some ScrapFX goodies and a Guest Spot on the blog.  Of course there is a slight twist - I mean what is a challenge without a little twist, right?


This sketch must also be used in the creation of your project.  Isn't it a fantabulous sketch?  You can use it as a launching pad for your design or follow it straight away - just as long as you share how you used it.  And before you ask, you don't have to use ScrapFX goodies in the creation of your projects.  We understand it may be tough yet for our fans to get their hands on the goods, so create away with what you do have and best of luck!!
 
Now for my 2nd project this month using this board.  I already posted my first here.
 
 
 I went with a cutie lil' mini canvas this time around.  I was highly inspired by the colors of the board and all the textures of the fabrics and the nest.  I also pulled a bit of inspiration for the background from the organic patterns found on those fabrics.  I did indeed use the sketch for my design but in this case I used it as more of a launching pad since my canvas was so small.  I pulled certain elements from the sketch and translated them to where the main items I used on the canvas would be placed.   
 
The background is made up of paint, mist rubbed on, stamping, stenciling with some paste and my fav ScrapFX stencil (Random Dots), a bit of pastels for highlighting certain circles, and gold mica flakes.
 
 
 I left the butterfly bare since there was so much color going on everywhere else and just coated it with some glitter glue.  When the glitter glue was added it actually deepened the color of the bare chipboard a tad and I really like the effect it gave.  The words were painted with some acrylic paint and highlighted with a white pen.  Doilies, sequins, and a rhinestone flower finished everything off.
 
This piece came together really quickly with the longest part being the dry time for the gold mica flakes - which actually don't take too long in the grand scheme of dry times - and yet it packs a punch.  Power to the mini canvases!!  So glad I have a bunch of these stashed away - can't wait to play some more with them.  What do you have stashed away that could be a hidden gem to play with this weekend?  Perhaps you could use it for your entry in to the challenge at ScrapFX.  Hope to see you there!!


Thursday, September 29, 2011

A Quickie

Hey, hey, hey. Just poppin' in quick to share a couple projects.

Simply Put


This was my uber fabulous hubbie's anniversary card this year. I started with a circle card base, adhered patterned paper to the bottom, and used a mask with colored molding paste at the top. I'll whip up a tutorial for how to do this technique soon. In the meantime I do have a step x step card published in Scrapbook News and Review Magazine right now to show you how to do it. Once the paste dried I added some gold mica flakes. Again this had to be set aside to dry. Gold mica flakes go quick though. After dry time I went to town embellishing with fussy cut images, sequins, cardstock stickers (love), pearls, and pins.

Confidence


I've tried and tried my best to get this photo to edit out right and the colors still look off to me, aww well, what'cha going to do, right?

This is a LO of my daughter pitching her 1st game of softball. Her coach had been asking and asking if she wanted to pitch and told her she was more than ready. She could only take the mound when she found the confidence in herself. I'm so glad I caught this moment of her first pitch.

I surprised myself by going real girly and less sporty with this page, but I think it works to really focus the page on the topic, which is confidence, rather than the act of pitching a softball.

Alrighty, moving right along. How about one more and then it's a done one for today.

Casting Crowns


This is a collage LO I created on my favorite band, Casting Crowns. It's a Christian band that rocks my soul. I did an image transfer from the insert that comes with a CD to have the image of the band in the corner and the silhouette to the right of it. I layered on tons of different elements and mediums to create this and I'll work on some breakdown photos if anyone would like to see that. Let me know, K?

All of the above projects were previously published in Scrapbook News and Review Magazine. Speaking of which, another event went live my friends. The Serendipity Stamps mini event is available on the forum. Lots of really cool ideas on how to use stamps by my fellow staffers.

Here's to wishing you a beautiful day. I'm enjoying the fact we have a couple hour window here with no rain. Gotta scoot my boot out and take care of chores before it pours, LOL.

Blessings ~ Scarlett


Monday, April 18, 2011

Projects to Share

Hey Blog Friends! Happy Wednesday to you! I never know what to title my posts. Do you ever have that problem? I always try to think of something catchy, but there are more times than not it escapes me, so I went the easy route....projects to share. LOL!

I have a variety for you today, all are projects previously created for and published in Scrapboook News and Review Magazine. My file of things to share from there is unbelievably huge! I'm not sure I'll ever get caught up, but it'll be fun trying. The April issue will be available soon, you should head over to get your subscription!! You won't be disappointed at all.

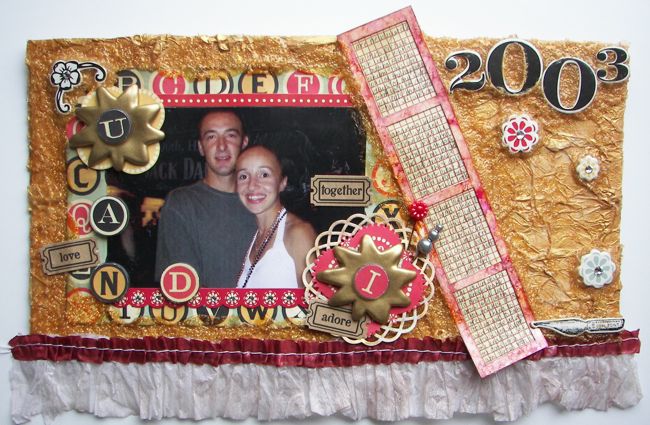
First up a LO. I'm not sure what call I did this LO for. I have a feeling it was for a sketch call and I changed up the size to make a 6x12. I really like 6x12 LOs and now that I can work the sewing machine, YAY!, I can actually modify my page protectors!!

U and I

This is a picture of my hubbie and I. These pictures are so special because they are few and far between. I wish I had more of us together. I used some cardboard for my base because I knew I was going to be adding some goops to my LO and that makes your pages a bit heavier. All the patterned papers I used are Cosmo Cricket from the Circa line.


In this close up, you can see the texture of the background a bit better. All around the photo and bellies I used some glass bead gel mixed with some metallic paint. I really love not only how this looks, but how it feels. I am such a sensory driven person. I feel the need to touch everything!

This is another shot where you can see the texture of the background. This area really highlights the tissue paper I laid down with some gel medium and then painted over with metallic paint. The frame holding the journaling is from K&Co, I believe, and I went over it with some alcohol inks.

Moving on to a card now.

You Hold the Key


For this card I cut, embossed, tore my patterned papers (Crate Paper), and then wrapped it with the hemp cord. I tied on the key and some little beaded charms I made. I am all about the beads these days! I have a huge stash of them and am having a blast creating all sorts of charms, stick pins, etc.. Next, I adhered my patterned paper to the base of my card. Then I went around the edges with some blended fibers gel. I let the card dry overnight and added some metallic paint to the gel the next day. The heart circle was stamped and then I used some paint markers to color the heart in and write around the edge.

And last for today an ATC

I.R.L.

This ATC was done for a movie themed ATC call. I had to go with Scarlett O'Hara because after all, my full name is Scarlett O'Hara. Yeah, you read it right, LOL! My middle name is O'Hara, my mom totally loved the movie. It seemed appropriate for me to do this ATC sharing with the world I am the in real life Scarlett O'Hara. No big screen for me, just a regular gal living a blessed life.

The base of my ATC is made with beeswax that I colored. I laid the image I pulled from he internet down into it, along with the stars. Then I added a little more wax so I could get the picture of myself on. To finish it off I added some gold mica flakes, my letters, and some bling.

That's it for today, are you still with me?! LOL! This was along one. Thanks for hanging in there with me. I love knowing you stopped by and hope you have a blessed day.