Showing posts with label Altered Items. Show all posts

Friday, April 18, 2014

Sharing Some Loves - ScrapFX Style

Happy Friday to You!  Today I'm sharing up a couple sneaks of projects I currently have posted to the ScrapFX blog featuring some of my loves.
 
 This first project features my love of the country life.  I'm so blessed to have my dreams coming true of building a homestead that involves chooks (chickens), goats (yay!! can't wait to bring my babies home next month!!), and a larger scale garden this year.  There is a tutorial posted on how I built up my background so be sure to pop on over and check it out. :D


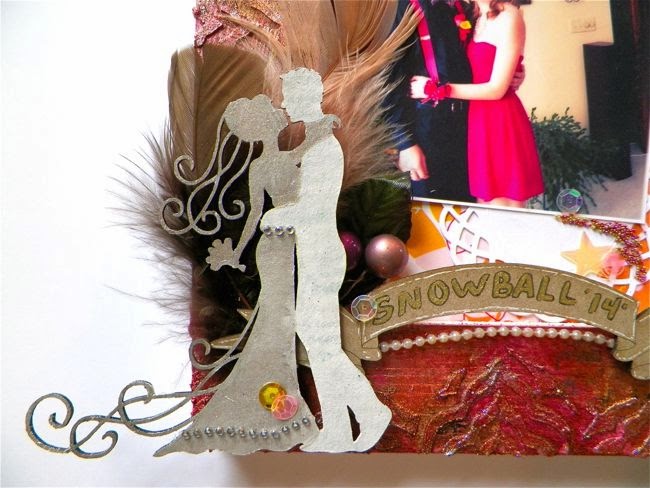
Even though you can't see him in this shot - my boy is surely one of my loves!!  Here he is all decked out with the other gal that shares his heart.....ahh, young love is so sweet.  This altered piece will be gifted to his girlie today. Can't wait to give it her; she is a darling.

You can head on over to ScrapFX to see the full reveal if you'd like, I'd love it if you did!! :D

Thanks for stopping by today.  I hope you and your family have a blessed Easter!

Saturday, October 19, 2013

Merry Christmas - Preparing for Market

Hi Friends!  I know, I know we haven't even hit Halloween or Thanksgiving and here I am titling a post Merry Christmas.  Alas that is how one must roll when you're preparing for market (I love that my international peeps call it market - much better than craft fairs, etc that we use here so I'm rolling with that too). 


Its especially super when I can double up my creations with DT assignments as was the case with this little hanging decor piece or ornament.  It was created for the new Mood Board Challenge that just went live over at ScrapFX.  What is funny is that upon looking at the board I'd never thought at first I'd wind up with this as my final project - ha!  Really amazing how inspiration can strike at any moment.


These Christmas chippies make it quick and fun to make a variety of joyous projects.  I'm seriously delighting over all I'm making - particularly the process - and love that with just a few alterations I have one of kind creations I hope people will love.  And how about that Instaframe??!  I must admit I was totally tickled when it dawned on me it could be decked out in red and white to mimic a candy cane.  Prior to choosing it I had one with polka dots picked out - this is much better dont'cha think?
 
I do hope you hop on over to the ScrapFX blog here to check out the Mood Board Challenge and join on in with us!!  You have the chance to win a guest spot on the blog and a nice little package of goodies too.  Woot!!  Oh and before you ask, you don't have to use ScrapFX products to participate.  If you have them, fantastic, but we do realize not everyone has access to get these fabulous goodies just yet.  So what are you waiting for??  Head on over to the ScrapFX and play along!  I'd love to see some of peeps there. :D
 
Have great Saturdays and see you soon, Take good care!!


Friday, September 20, 2013

More Fun with Stamping - A Mixed Media Birdhouse

Happy Friday Peeps!  I've continued on with my stamping frenzy and I must say I'm kind of hooked on these feather stamps from ScrapFX:


If you noticed in my last post I used them on just about every project.  I just can't get enough of them and have oodles of ideas flowing.  In keeping with my play/create everyday theme I decided I'd bust out some fabric and stamp on that.  


I have heaps of muslin cloth in my stash and that seemed like a great place to start.  I began by stiffening the fabric with some spray stiffener only I didn't spray it on I brushed it.  Once that was dry - yes I used my handy dandy heat gun to help it some ;) - I pondered how I was going to stamp on it.  My first thought was to use paint, but then I decided I'd try out embossing.  So I mixed up some Lindy's Magical Micas with clear embossing powder, sprinkled it on my VersaMark stamped image, and heated it up.


Booyah!  A beautiful fabric feather.  The material is super stiff now and ready for whatever my heart desires to do with it.  It also blended right into the fabric making it appear as though it actually was printed on it - kind of neat effect I think.  


I played on and made some glittery feathers too!  These were stamped on the stiffened fabric (I stiffened a bunch right away so I could play a lot) with gel medium on fabric and while the medium was still wet I sprinkled it with glitter.  I set them aside to dry and after what you see above is what I got.  I must say it was a little tricky to stamp with the gel.  Definitely had to do a couple test runs to get the image to come out right.

So now what to do with these pretties?? 


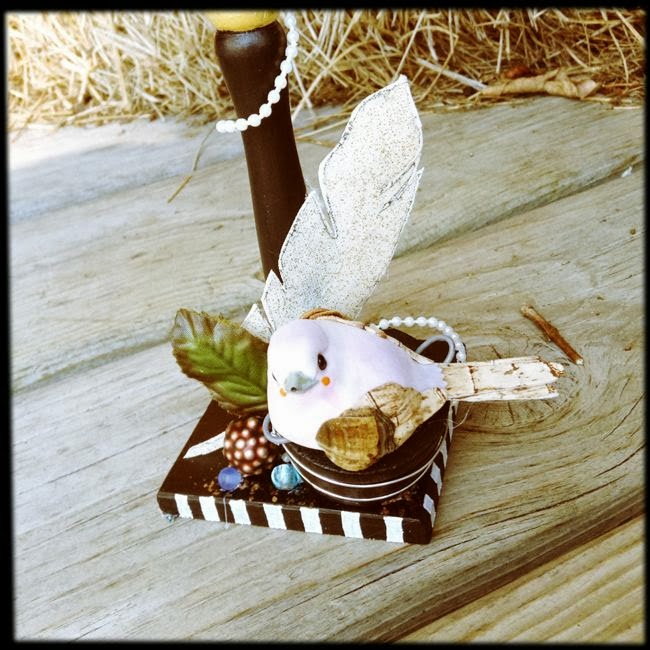
One with a little birdie in a bucket and some other little tidbits is rather cute.  The stiffened fabric really worked to my advantage here allowing the feather to stand up nice and tall on its own.


A cluster of two more looks pretty along with a ScrapFX chipboard flourish and some of the floral pieces I had in my stash from when I got ambitious and thought I'd go on a wreath making frenzy a while back - yeah didn't happen, but hey at least the items were on clearance - ha!


All coming together to create a whimsical mixed media altered birdhouse.  Typically I'm not a birdhouse altering person but I had this in my stash (I actually have a lot of these wooden type things in my stash) and felt inspired to give it some life by the current Moodboard Challenge up on the ScrapFX blog.  Do take some time to check it out and join us in playing along!


I used Liquitex Coarse Texture paste on the base, after it was primed with gesso (white), and then coated it with a variety of paints - both store bought and self mixed with Lindy's Magical Micas.  Then it went back and highlighted the areas I wanted black with some more paint.  This took patience I tell you what.  After it was dry I went in with my white pen and added the doodles and started attaching all my embellishments.  Oh and the roof!  The roof is done with burlap, some glitter, and gold mica flakes.  All sides are altered with paint the same as the front.

Since I stamped on some fabric I'm going to link this up to Simon Says Stamp's Monday Challenge Blog where the current challenge is to stamp on something other than paper or cardstock - check!

Thanks for joining me on this adventure today.  Don't forget to head on over to ScrapFX, check out the Moodboard and what my fellow DT members made, and play along for your chance to win a guesting spot!!

Take good care!

Monday, July 1, 2013

Welcoming July with Open Arms!

Hi There!  Its July, can you believe it? Summer is flying by - here in my neck of the woods we're just finally getting the taste of it!! 
Much of June looked this:

Ominous skies looming over head and blowing in quite quickly.  This would happen all throughout the day off and on, day and night.  For the last two throughout June. Boo.
With this to follow:

Sheets of hard rain, along with high winds and hail at times, would come from those skies, lasting in various time frames.  Leaving pools of water and messes everywhere.  Heat and humidity would come after.  Just when you thought it was safe to go and do something - another wave would come in. Sigh.....
To say we've been cooped up would be an understatement.  We've dealt with terrible storms off and on for a couple weeks, horrendous winds, flash flood warnings, and it goes on.  The farm fields around our house did indeed flood - poor farmers, our ceilings sprung leaks, kennels are slop holes - poor dogs, and our basement is flooded as well.  Good thing its really not used since our house is a 100+ year farm house and the floors down there are dirt - yes dirt! - Its a mess. 

But with all messes and yuck - you find the good, right? 

In between storms this happened:

My boy has been holding it down at a new job and really lovin' the fact he is earning his own income.  When we were out strolling around town one day after dropping his sis off at softball practice he surprised me by taking me out for an ice cream!  It was so lovely to spend time with my almost 17 year old on a date. :)

And of course there has been oodles of crafting going on since we haven't been able to get out much!

Lots of ScrapFX chippies were used on this creation along with a stencil on the canvas.  Other than that she is made up of oodles of bits and pieces of found items that had been laying around my space for far too long!
I showed you a sneaky peek of this little Fairy Art Doll creation in my last post and since then the reveal was posted the ScrapFX blog so I can share her here now.  Kind of funky and different - totally fun to create.  To get more details on how she was created you can head on over to the full reveal post by clinking here

She shares a post with this creation: 

I cannot tell you how much I love the mini ScrapFX chipboard pieces!!  They really are so versatile for all sorts of crafty projects.  You should seriously put a bug in your favorite crafty store's ear about carrying ScrapFX products!!  Its really very easy for them to get started!
A mixed media canvas based on one of my favorite songs I used to sing to my kiddos when they were itty bits!!  To see the full reveal of this creation I'd love for you to go here and let me know what you think. 

Well that is all for today, I'll be back again soon as I've so much to share now that our internet is up consistently with sunny skies in the forecast for some days!!  Hooray!  Bring on summer please. :)

Take good care and have wonderful Mondays!


Monday, August 30, 2010

Something New I Tried

So I told you all I would share what made for DH for our anniversary, he really liked it and so did I to be honest. It was a fun lil' project to make and my plan is to make lots more. Thanks so much to Betty Anne and Tracy for the well wishes on our day!

Here's the altered frame I made for him:


DH has his favorite dog around here and here she is with him. He calls her the best hoond and I have been wanting to create something documenting that. I think the frame was all of $2 and most of the materials I used were scraps or things I have had in my stash for a long time.... love that! My mission lately has been to use up what I have.


I used Maya Road chipboard...my favorite...and jazzed them up. The letters were glittered glazed, meaning I mixed my glitter with some Diamond Glaze and then painted it on. This is oh so helpful in getting the glitter to stick and giving it a nice sheen along with the sparkle. The heart was just glittered to leave it more sparkly. On the tree I used some Ranger Crackle paint to give the appearance of bark and then inked over it.

This butterfly was made the same ways as the letters and then I just clustered some other favorite things there. I am totally falling in love with twill ribbon and am so excited I have been able to find it in a variety of widths and colors for cheap!

I'm going to save sharing the card I made for him since it features A Walk Down Memory Lane's featured manufacturer for September and well, it's not September yet...LOL! Here's a sneaky peek for you tho'!


Can you guess what manufacturer is up for the spotlight?? I'll be back tomorrow to share with you all who it is.

Have super days everyone, God bless!
Scarlett

Tuesday, April 6, 2010

Altered Composition Books

Well, as promised I am back tonight with the altered composition notebooks I made for my kiddos. They both were completed using We R Memory Keepers products, which are on sale this month at A Walk Down Memory Lane for 25% off!!!

Here is the one I made for Whitney:


Her favorite color is blue, so this paper was perfect for the background. Plus it already had the little flowers on it so all I had to do was add some buttons!


Aren't those birdies cute?? I fussy cut them from one of the papers. The letters I used are from Jillibean Soup and they are also available in the store!

Next up Malik's Notes


I have used this fab grungy boy paper for a number of things for him and he loves how it is full of cars, iPod images, and other likes of a teenage boy!


Thanks for stopping by and checking out the notebooks I created! I hope this inspires you to dress up those composition books you may just have laying around your house! Be sure to head on over to A Walk Down Memory Lane to get your 25% off some of the products I used!


Saturday, February 20, 2010

News from A Walk Down Memory Lane

Do you love reminiscing...... remember the good ol' days of big bangs, layer upon layer of clothing, leg warmers, and side pony tails!!! Well, if your memory is a little cloudy, we are going to help you dust off the 80's file in your brain with an I Love the 80's Crop!!! Yep, a full month of fun challenges all geared around the fab 80's!!! There will be lots of fun happenings and prizes. Plus, it is A Walk Down Memory Lane's 7th Anniversary so there is sure to be some added excitement with that!
So be sure to join us beginning March 1st for the:


You should also be sure to stop by the AWDML store, so you can take advantage of the 25% discount being offered on this month's featured manufacturers - Hero Arts and Fancy Pants. I just love both companies and had a lot of fun working with some love themed stamps from Hero Arts. I have loaded up oodles of projects to the gallery. Here are a few of my creations that can be found there.

Valentine Treat Bag


I made this for DH using scraps of Fancy Pants papers I had, Hero Arts stamps, and my Martha Stewart border punch. The clip is from MM and the tag and rick rack were in my stash.

{Hoo} Loves U - Love Tin coupon holder


Isn't this just the cutest little thing??! This was another valentine's Day present my DH received. I used an altoid tin from the store, cut the heart from a scrap of Fancy Pants, used scraps of Dream Street, and the little owl is a Hero Arts stamp I cut out.

Cards in tin:


Fronts of cards:


The fronts of the cards share some of the reasons I love my DH. I used Dream Street papers, Maya Road sheer journaling tags, and Little Yellow Bicycle stickers.

Backs of Cards:


The backs of the cards give my DH coupons for fun things like a back run, ice cream, relaxing bubble bath, etc.

He adored his little tin, more than I thought!!! He just kept looking at it saying this is just the cutest little thing! He hasn't cashed in on any of the coupons just yet though!

10 Things I Love About You


This was DS's Valentine from me. I actually took off the backing and turned it into a wall hanging for his bulletin board in his room.

I have a few more little cards to share, but I will come back a bit later with those! Hope you all are having wonderful Saturdays.


Thursday, November 26, 2009

Happy Thanksgiving

Happy Thanksgiving to all my scrappy pals out there in blogland!! I hope your day was filled with love, family, food, and thanksgiving! The Lord has been soo good to my family I just cannot express! We have soo much to be thankful for and it's nice to just take a day and express that thanks to Him!

Today also marks the beginning of the Christmas season!!! YAY! With all the sales going tomorrow, decorations going up, and Christmas shows and music playing I am in the full Spirit of the season!! I have decided this year I really want to show the true meaning of Christmas to my kids..... yet again.... it is soo hard as they get older to help them focus on the giving part, rather than the receiving when society and their peers are telling them they need to be asking for the latest and greatest stuff. Well, around here, it's going to be a homespun Christmas!! Now, don't get me wrong, I am sure my children will have some beautifully wrapped store bought presents under the tree, but leading into that they will help prepare many hand crafted gifts, baked goods to fill them, and decorations for our house, as well as others!

So, I thought I'd share the first gift I have completed. I made this for my DHs sister. They lost their mom quite a few backs now and I have always been soo sad I never met her. I hear them share the wonderful memories they have of her and look at all the wonderful things of this world she left behind and just know she was a beautiful woman inside and out! My SIL has soo many recipe cards because her mom liked to collect recipes. She has them stored on teh bottom shelf in a cupboard and always talks about how she just can't get rid of them, but they are useless where they are at. So I decided to help her solve this problem by making an irresistible recipe box. I know this will be the perfect thing to hold all the memories.

Recipe Box & Dividers


I was soo pleased with how this turned out!! I regret that I didn't take a before picture, but I do have a smaller version and may just take a picture of that and then update this. The wooden box I used was a plain wood color and I think it was supposed to be some sort of bug box. The cards are chipboard from Fancy Pants and 1 was created myself using a 12x12 piece of chipboard I had.


This is the front of the box. All of the papers I used are from the Domestic Goddess collection by Graphic 45. I just picked this up recently at my LSS (see side bar) and I am in love! There is soo much potential here for soo many cute projects! The letters used are this are from AdornIt.


This is 1 end of the box. Again the papers and the tag are from the Domestic Goddess Collection and the button is from Foof-A-La. They have these great sacks of buttons I picked up at my LSS and I am soo glad I did! I have used them a lot and so has DD!


This is the back of the box.


This is the other end of the box.


This is the top of the box. I fussy cut the flowers out of the patterned paper, inked and curled the edges a bit, then added the dressed button for the center. I had no idea how I was going to age up the look of this box to match the papers when I started this project..... and then it hit me..... INK! Yup, I used my handy dandy ink pad and just went to town to create the look I was content with!


These are the divider cards up close for the inside of the box. Most of the papers used are again from Graphic 45, but there are a couple of Cosmo cricket things in there too! I used a prima flower as well as a fussy cut one..... this time with the other side of the patterned paper showing. To age the chipboard, I used my ink pad. The tabs were from some ribbon scraps.

I cannot wait to give this to my SIL in the next couple weeks for her birthday... we don't do adult gifts at Christmas anymore, so she will get this soon! :0)


Tuesday, November 17, 2009

A Christmas Pleaser for Sure!!

I am a woman who loves the Lord our God with my heart, soul, mind, strength. I delight in celebrating the things He does everyday and knowing He will be there when I need to call! I thank Him for His wonderful gift in Jesus! I adore Christmas and all that it brings (minus the commercialism)!! To celebrate the birth of my Savior is just wonderful. I love all the senses one engages during the Christmas season......smells of cinnamon, hot chocolate, cookies; sights of all the decorations, especially the lights!; sounds of all the awesome songs.... I personally could do Christmas songs all year!!; I could just go on and on! The one thing that really sticks out to me from when I was a kid was waiting to get my advent calendar for the official kick off to the season! I absolutely LOVED when my mom and dad would get me the store bought calendar with the little perforated windows that fold back to reveal a little chocolate. Now, you have to remember I do not like chocolate, so I exchanged these tasty morsels to my dad for other candy and change. I have carried this on with my own kids and now DH even gets in on the action and loves his. Well, lemme just tell you my eyes almost popped outta my head when I saw a beautiful handcrafted scrappy advent calendar in the Holidays magazine by Scrapbook Trends. The project in the mag was done by Elisa Giffin.

This is my recreation of her project:


Holy Advent Calendar, huh?? I thought initially this would be a huge, time consuming project to do; it actually went rather quickly since I cut and prepared all the papers in advance.

So, I know you are just itchin' to know how to do this, right??
Supplies Needed: 16x20 canvas (in the mag it is a stretched canvas on a wooden frame and I used a flat one from WalMart that was MUCH cheaper), wedding favor tins (I purchased mine from Michael's.... be sure to use a coupon, you can get them sent to you via email), card stock, patterned papers, 2 inch circle punch, bellies, and number and letter stickers.

Here's what to do:
I like to do all the prep work first so I am listing what I did in the order I did it in.... do what works for you!!

Cut 12x12 cardstock into 3x12 inch strips to create top border.

Cut rest of cardstock into 24 - 3x3 squares.

Cut a alternate color of 12x12 card stock, or patterned paper if you like, into 2 5/8 x 12 inch strips.

Cut patterned papers into 24- 2 5/8 x 2 5/8 squares.

Using your 2 inch circle punch, punch 24 circles out of patterned papers.

Cut thin strips for the wedding favor tins..... I know they had to be 7 inches long to go around with a bit of overlap, but I don't know what the exact measure is for the width.... it just worked out perfectly on my trimmer on the silver part.

Line it up and glue it down! I eyeballed mine... but you could use rulers to create the grid too.

Adhere the punched circles to the tops of the tins with a glue dot.

Embellish your heart out!!

Add numbers and your lettering for Days til' Christmas and voila!!!! You have one awesome advent calendar.


This is going to be DSs. He thinks it's really cool and is glad he won't have to deal with the chocolates anymore like I did!!! LOL!!! Apparently I passed that dislike on to him!


DD has requested that her and her daddy have a more girly calendar! She looked through my papers and decided on some non-traditional Christmas papers and she wants me to incorporate penguins somehow!!


Thanks for looking at my project.... if you make one leave a link so we can all be inspired!