Sunday, May 8, 2011

Happy Mother's Day!!

Hope all of the mamas out there are having a terrific day. I feel really blessed this year for so many reasons. One of them being for the first time in my life I got to text my bio mom Happy Mother's Day. I am so thankful for having met her IRL last summer and since then so many family members, including my Grandma. This is the first time in my life I've had a real Grandma. It's an amazing feeling and I am elated my daughter gets to have a Great Grandma. How amazing is that?! Well, it might not be that amazing for some, but for me it surely is.

Today I have a LO to share that shows off my new family. It's 4 generations of girls, all biologically connected. That's still a surreal feeling for me.

Generation


This LO was published in the March issue of Scrapbook News and Review Magazine for a LO on a cardboard base call. I ripped away some of the cardboard to expose the corrugation. To do this add some water and soak the part you want to reveal before trying peel. It makes it oh so much easier. I laid down some patterned papers, my photo, and a photo frame mat then went to town with some goops and embellishments!


Clustering is one of my all time favorite things to do. I love mixing and matching a variety of embellishments to get the just right look I am going for. I made the two larger tissue paper flowers myself. Be on the lookout for a tutorial on those here soon. It's been awhile since I've shared any tuts, so I'm anxious to get crackin' with that. The butterfly was punched from a vintage check. I picked up a bag of these at an antique shop and I love using them. After I punched it I dipped it into UTEE to get a glass like finish. The other odds and ends are Maya Road chipboard flourish decked out with glitter. My new love for doing this is using spray adhesive. I don't know why I didn't think of it sooner, LOL! Some Prima flowers I've had for ages, a MM metal piece from a Noel Mignon kit, and some buttons.


Here's a better look at some of the texture I created. I used some ceramic stucco to achieve this. I applied it to my base with a palette knife and to achieve the peaks, I simply patted my palette on top of it pulling up slightly. Does that make sense? Hope so. Then I went to town with PearlEx and Lumiere paints to get it all sparkly and gorgeous. I wish that would come across in photos....sigh. the letter stickers are from My Mind's Eye. I applied them first and then strung the pearl string across the top.

Thanks for stopping by today. I hope you enjoyed a peek at this project. It's one of my favs and was a blast to create for so many reasons. Be sure to check back tomorrow because I am going to be giving away some blog candy as a thank you for reaching over 100 followers!!!! WAHOO! Thanks so much to everyone who takes time to follow along with me!

Have a blessed rest of your day and I'll catch you all tomorrow. ~ Scarlett


Wednesday, May 4, 2011

Hodge Podge

Hey there! It was one of those days today where when it's all said and done, you just need a way to decompress. I thought and thought about what I could do and it struck me....I haven't blogged on way to long......again....so I'll do that and then hit the hay.

I have a hodge podge of projects I have created for Scrapbook News and Review Magazine. Let's roll!

ATC

Change


This ATC is among the first few I did where I really got messy and explored with a variety of mediums. I used gesso for the background to get a bit of texture going. Then I painted over it and adding some molding paste through a stencil. I sprayed the molding paste with some mists to give them color and to alter the color of the background some. The last step was adding a quote and some bling.

Layout

Isn't All That


This LO was created for a call about your little secrets. While it's no secret I'm a skinny minnie, the reason why isn't all that glamorous at all. I mixed and matched manufcaturers to my heart's content on this page. October Afternoon Thrift Shop, Crate Paper Restoration, Sassafras Lass Indie Girl, Maya Road goodies galore, a few Prima flowers, and a few other things from my stash.

Inchies

What's not love about these fun little creations?!


The background for these is some dictionary paper covered with PearlEx paint I mixed up. The bird stamp is from Unity on October Afternoon Fly a Kite scraps...love this line and am still using scraps of it here and there. The little button brads re Making Memories.

A Card

I must say this is one of my favorite cards I have created lately!

It's Owl Good


For this card I used some October Afternoon Campfire papers along with Crate paper's woodgrain from restoration. I used my Sissix Tim Holtz embossing folders to get texture for the tree. The chipboard is is October Afternoon and Basic Grey. My favorite part is the stamped owl and sentiment. They are Studio G.....you know from the dollar bin at Ms?! The owl is stamped on some sticky back canvas and then I used paints to highlight it.

Finally an art journal page

Right Now


A few posts back I posted the base for this page. To see all the knitty gritty details, you can head on over to the SNR front page, look under Mixed Media tags, and it'll be there.

Alrighty, this was a long post so thanks for hanging in there with me. I so appreciate each time you come to visit and love reading your comments.

God Bless you and yours.


Monday, April 18, 2011

Projects to Share

Hey Blog Friends! Happy Wednesday to you! I never know what to title my posts. Do you ever have that problem? I always try to think of something catchy, but there are more times than not it escapes me, so I went the easy route....projects to share. LOL!

I have a variety for you today, all are projects previously created for and published in Scrapboook News and Review Magazine. My file of things to share from there is unbelievably huge! I'm not sure I'll ever get caught up, but it'll be fun trying. The April issue will be available soon, you should head over to get your subscription!! You won't be disappointed at all.

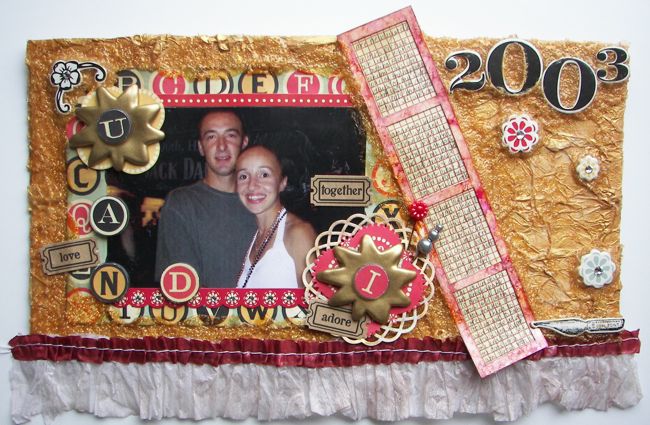
First up a LO. I'm not sure what call I did this LO for. I have a feeling it was for a sketch call and I changed up the size to make a 6x12. I really like 6x12 LOs and now that I can work the sewing machine, YAY!, I can actually modify my page protectors!!

U and I

This is a picture of my hubbie and I. These pictures are so special because they are few and far between. I wish I had more of us together. I used some cardboard for my base because I knew I was going to be adding some goops to my LO and that makes your pages a bit heavier. All the patterned papers I used are Cosmo Cricket from the Circa line.


In this close up, you can see the texture of the background a bit better. All around the photo and bellies I used some glass bead gel mixed with some metallic paint. I really love not only how this looks, but how it feels. I am such a sensory driven person. I feel the need to touch everything!

This is another shot where you can see the texture of the background. This area really highlights the tissue paper I laid down with some gel medium and then painted over with metallic paint. The frame holding the journaling is from K&Co, I believe, and I went over it with some alcohol inks.

Moving on to a card now.

You Hold the Key


For this card I cut, embossed, tore my patterned papers (Crate Paper), and then wrapped it with the hemp cord. I tied on the key and some little beaded charms I made. I am all about the beads these days! I have a huge stash of them and am having a blast creating all sorts of charms, stick pins, etc.. Next, I adhered my patterned paper to the base of my card. Then I went around the edges with some blended fibers gel. I let the card dry overnight and added some metallic paint to the gel the next day. The heart circle was stamped and then I used some paint markers to color the heart in and write around the edge.

And last for today an ATC

I.R.L.

This ATC was done for a movie themed ATC call. I had to go with Scarlett O'Hara because after all, my full name is Scarlett O'Hara. Yeah, you read it right, LOL! My middle name is O'Hara, my mom totally loved the movie. It seemed appropriate for me to do this ATC sharing with the world I am the in real life Scarlett O'Hara. No big screen for me, just a regular gal living a blessed life.

The base of my ATC is made with beeswax that I colored. I laid the image I pulled from he internet down into it, along with the stars. Then I added a little more wax so I could get the picture of myself on. To finish it off I added some gold mica flakes, my letters, and some bling.

That's it for today, are you still with me?! LOL! This was along one. Thanks for hanging in there with me. I love knowing you stopped by and hope you have a blessed day.


Wednesday, April 6, 2011

Inchie Love

Inchies are miniature works of art created on a 1", 1.5", or 2" base. They can be square or round, if they are round they are called rinchies. I have been racking up quite a few of these little gems and am currently working on sewing some onto a canvas bag. It's a slow process since they are so stinkin' small, but I know I am going to love the bag when it's finished.

Scrapbook News and Review Magazine has calls for these every month and I would love to see some of my blog friends send them in for possible publication. The call for the month of May is Canvas. That means your inchies need to be created on a canvas background. Here is a set I created for SNR on some mini canvases I picked up awhile ago:

Butterfly Inchies


To make these, I misted up some dictionary paper and let it dry while I adhered some chipboard butterflies I cut out with a Spellbinders die. I used gel medium as my adhesive for this. The gel also acted as the glue for the paper when I layered it on top. The tape is from 7 Gypsies and I drizzled some tar gel over each piece just for fun. My final touches were some bling and glitter to the butterflies. I love glitz! These are hung up in my scrappy space and since I don't have a big one, they're perfect.

Here's a set of rinchies:

Joy Rinchies


Aren't they too stinkin' cute?! I think I put these together in all of about 10-15 minutes. It could have been less, but I decided to use some UTEE and paint with my embossing folder. After that it was lickity split.

Even if you don't submit any inchies or rinchies for publication, I REALLY hope you do though, you should give them a whirl. They are so easy to create, use up some scraps, and can be used in a variety of ways.

Hope you've had a good Wednesday.


Tuesday, April 5, 2011

Hoping This Works

Hi Everyone! I seriously hope I can get some bloggin' going on tonight. I haven't tried since my last post, but since I have the option of centering my text back I am hopeful.

The 1st of April came and went already, crazy!!!, and I have a new ATC to share. I created this ATC based on the April card sketch at My Sketch World. Lucy creates such fabulous sketches and I love how easily they can be used for ATCs.

Sisters


I really love how this turned out, even if my image transfer got a little messed up. My favorite part of this ATC is the background. I used some Lumiere paints, SWOON, and just delight in looking at all the sparkle these add.

Here is the sketch I used to create with:


April is also my month for doing a challenge at MSW, so in sticking with my ATC obsession, I went with an ATC challenge. the only requirement for this challenge is to make sure your creation is the accurate ATC size of 2.5" x 3.5".

This is the sample I posted:


For this background I used some October Afternoon patterned paper first and then covered that with a piece of a sewing pattern. From there I stamped some Maya Road doily stamps onto it, dressed up my Maya Road dress form chipboard, added some 7 Gypsies decorative tape, and an October Afternoon label sticker. Easy peasy and I again used up a ton of scraps.

I'd love for you to play along so be sure to head on over to MSW and check out this challenge along with all the other great ones posted.

I am super happy I was able to post today and plan on going back to my earlier saved post to share a few SNR creations with you as well.

Hope you have had a great Tuesday and your evening is peaceful.