Showing posts with label pan pastels. Show all posts

Tuesday, June 11, 2013

Quickie Tutorial: Stencil Embossing

Hey Sweetie Peeps!  Its been a long time since I've shared a tutorial with you and so today I shall give a quickie one on stenciling embossing.  This has been a popular technique I've used on cards I've shared and you'll be so surprised at how easy peasy this truly is. 

This card was created using an MSW card sketch.  I rotated the sketch and changed it up a bit to suit the vision I had in my head.  I really love using sketches for springboards in this way!
The cloud background on this card shows off the technique I'll be sharing today using some Crafter's Workshop stencils. Do you notice how the clouds seem puffy??  Pretty neat, right?  Let me show you how to do it.


 Since this tutorial is really so quick and simple I decided to go the collage route for the tutorial, follow along with the directions clockwise starting in the upper left hand corner.

Step One: Choose you patterned paper/cardstock and stencil you want to use.  Place the side of paper you desire to be embossed pattern down on top of stencil.
Step Two: Create you embossing sandwich. I use the Cuttlebug so my sandwich is A plate, B plate, stencil, paper, C plate.  Run this sandwich through the Cuttlebug.
Step Three: Gently peel away your paper from the stencil.  Notice I said peel.  Yes your paper may be stuck slightly to the stencil.  
Step Four: Stand back and marvel at your embossed piece of paper and prepare it to use on a project.  From here you can use inks, chalks, pens, and other soft dry mediums to highlight your embossed images.  I don't necessarily suggest wet mediums to highlight - they will take away a bit of the embossing and therefore defeat the technique.  But you can do what you like ultimately. ;)

This is what the cloud background looked like when it was completed with this technique:

Now it may take you a couple tries to get the embossing to work - just be patient and keep trying.  It'll happen. It took me a quite a few tries to get my alignment right and everything set before I actually had something work out the way I wanted it to.  At least you have the benefit of knowing which way the paper needs to be on the stencil - ha! ;)
 And here is another card I used the technique on, in fact it was the first one I ever tried this technique on:


You can see the original post for this card here.

Hope you like this technique and try it out!  If you do please share a link, I'd love to pop on by and see what you create using your embossed pieces. 

Have beautiful days!!


Sunday, February 12, 2012

Squeaking One In

Happy Sunday!  I'm stopping by the ol' blog to squeak in the LO I created for Skissedilla's sketch this week.  I'd been working on it, then had to push it aside, saw it today and decided to finish.  Just in the knick of time too as entries close in like 40 something minutes, LOL.  Anyhoo, here's my take on the sketch this week:

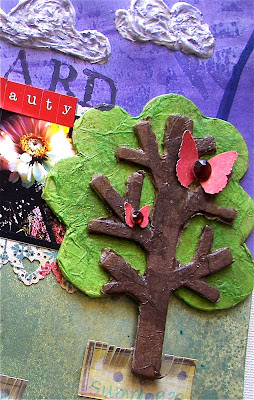
I covered this Maya Road chipboard tree with tissue paper and then sprayed it with mists - can't the sparkle but its there - journaling over gessoed strips of paper

I misted the background through a mask then used Pan Pastels over it - so cool the design still shows through and so does the shimmer - in fact the mist shimmer looks better under the pastels - modeling paste clouds brushed heavily with Shimmerz pearlz - stitched 'rain' coming down and Maya Road beads for drops.

I really can't believe how this page came together because it was a hot mess for a while thus the reasoning for me squeaking this one in - background took a bit to come together - thought I ruined it by adding the blue drips of ink - much simpler than most of my creations - I like simple
Here's the sketch and if you're loving on the Skissedilla sketches like I am be sure to check out their DT call. 


Have a great one!
P.S. - If anyone can tell me how to get the Google translate gadget linked up on my sidebar I'd love it!  I tried through Blogger and the gadget is broke - are there other options?  Thanks so much!

Friday, January 27, 2012

Getting Punky!

Hey there!  How's it goin'?  Fantabulous here - the sun is shining and its 40 degrees - ??! - yes you read that right - 40 degrees on a WI January day.  My DD went on a tubing field trip today and I can't think of any better weather.

So my title says I'm getting punky and that sure as heck is on.  I discovered a new challenge site called Punky Scraps via Michelle's blog and couldn't be more thrilled because the challenges there are right up my alley.  Lots of messy fun going on for reals!

While peeking around the site I saw this sketch:


Pretty sweet, huh?  With a little rotation of orientation this is what I came up with:
I swear this is prolly the quickest LO I've turned out eva'!  Everything fell into place the moment I knew what photos I wanted to use.  That never happens people!! 

Here's some deets for you to check out:

I loaded a stamp with paint for the border, attached the twine with a glue pen, and added some mist droplets.  The clouds were stenciled on using a mix of Pan Pastels.  My favorite part I must admit tho' is the title.  I really like how the placement turned out and since I wasn't sure about it in the 1st place that's a really good thing.
This is one of my favorite iPhone photos.  I'm sure I've already scrapped it and that's okay.  Here you can see a bit of the journaling I added to the banner strips and the texture added to the chipboard frame.  I did tat by using some Coarse Texture paste, let it dry, then dabbed on some Creative Inspirations paint.
Well that's all from me for today.  Make sure you check out the Punky Scraps blog, there are lots of other challenges posted besides the sketch and you've got until the 31st to play along.  Have fun!