Evening Friends! I'm here with my first post of the New Year and couldn't be more excited to share what I have in store with you so I'll get right to it!
I was sent a delightful package to work with for my GDT spot with Crop Stop and inside were some spectacular embossing folders. Now I'll be honest, its been a good while since I really got down with the plethora of embossing folders I already own so I needed to put my thinking cap on because I really wanted to bring my love of mixed media to these beauties.
I started with this folder
Isn't it gorgeous?? This is the Happiness, Ho! Ho!, Ho! Limited Edition (A2) folder and its currently on sale so if you want this beauty for yourself - get on it!
To do a debossed background paint technique - or at least that is what I am going to call it.
Now because this technique required swiftness I couldn't take pictures, sorry, but this is what I did in words. The debossed top half of the folder was covered in sky blue paint and the bottom debossed half in a landscape green - both Claudine Hellmuth (available in the store as well). I placed my cardstock in the folder and ran in through my Cuttlebug and this is what it came out looking like
Ooo, pretty yes?! Love the artsy, blended background it gave me and the additional texture on the raised embossed areas from extra paint. I immediately took the folder to the sink and washed it with a bit of luke warm water and a bit of dish soap. Once I did this it was squeaky clean!! In fact the first photo of the folder I shared is the one I took after I washed it! ;)
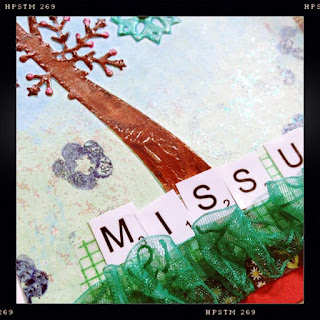
Now to get the tree looking a bit more tree like I busted out my handy dandy gel pens. I have a variety of these from Sakura brand to the ones you'd find at stores like Target in the school supply section. I started coloring away at the embossed sections - yes this requires patience - lucky for me coloring is in my blood being a former early childhood teacher and all.
Another detail shot. In this one you can really notice the two shades of brown in certain areas. This is huge difference in saturation of paper. The areas where the brown is lighter the gel pen soaks right in to the cardstock dulling the color; the areas where the color is rich the gel pen sits atop the paint. Love this advantage of the technique and will keep this tucked away as food for thought in the future.
I brushed some of the Crystal Stickles sent to me over the grassy area to add a bit of shimmer, then stamped a few flowers using the Tsukineko stamp pad I was sent - the color is Paris Dusk - so lovely. this isn't something I probably would've chosen on my own - really excited ti now have it as it could function almost like a black ink pad, but lighter. Does that make sense?? Another beautiful item sent to me was some ribbon. I adore collecting ribbon, looking at it on other people's projects, but am really terrible at getting it on to my own. I decided to challenge myself right away to use some and ove how this particular piece of green organdy swirl gathered up so nicely across the
bottom of the card. Maybe I'll become a ribbon using girl yet. ;)
So what did all these bits and pieces make?
A cutie lil' whimsy card. I was really pleased to use the Happiness folder in a way that was different from its intended purpose - I mean its meant to be seasonal, right? You do see the snowflakes?? But that is the beauty of being creative and stretching one's mind. I really wanted to show and share this is not just a seasonal folder - it need not be stashed away or decked out only in snow - think of all the beautiful possibilities this holds. I know I am.
Thanks so much for popping by! I hope you enjoyed this as much I did sharing it with you - if you have any questions about how to do this yourself, please ask away!! And be sure to head on over to Crop Stop to check out my post there and get all the links to what I used so you can shop away!
Take good care, Scarlett


Cool as always, thanks for the tutorial!
ReplyDeleteThis is gorgeous- thanks so much for the tutorial!!
ReplyDeletexErin
This is incredible! Such a great way of using the folder...
ReplyDeleteWhat a fun technique! I've often wondered if I could add color to my projects this way. Thanks for the tutorial and the inspiration! Happy New Year! =)
ReplyDeleteTHanks for sharing this cool techniques, Scarlett! Adorable card!
ReplyDeleteooooooooooh, awesome!!!!!
ReplyDeleteSuch a gorgeous project, scarlett!!
ReplyDeleteReally pretty! Great technique with the pens!
ReplyDeletethank you so much for sharing this really great technique! love this project! your work really shines and inspires!
ReplyDeleteThanks for sharing your cool technique! I am going to have to try this! Your card is amazing as always!
ReplyDeleteOh wow!!!! Best Tute EVER!!!!! Love this sooo much! Wow!!!!!!!! :D
ReplyDeleteGorgeous and the folder is beautiful.
ReplyDeleteThe embossing folder idea is so so clever! I think you are a technique genius, my friend. Paint, color, texture happiness....it's all here! :)
ReplyDeleteI've been thinking of you, and wondering how you're doing. I know you're brave, and facing all the difficulties with grace. You are in my prayers...and I send lots of love to you. <3